-
Par ©Moi-Même le 4 Septembre 2022 à 21:43
Balancoire_2022
This tutorial is by Béa
Thank you Béa, for allowing me to translate your tutorial
This tutorial is protected by copyright
The material provided is protected by the authors of the tubes
It is prohibited to appropriate or modify the original and / or signatures.
Any dissemination without written authorization is prohibited.
Original Tutorial On Here
Material On Here
Plugins:
Unlimited
Mehdi
Carolaine and Sensibility
Ap Lines
Alien skin eye Candy 5 Impact
Version according to the original:
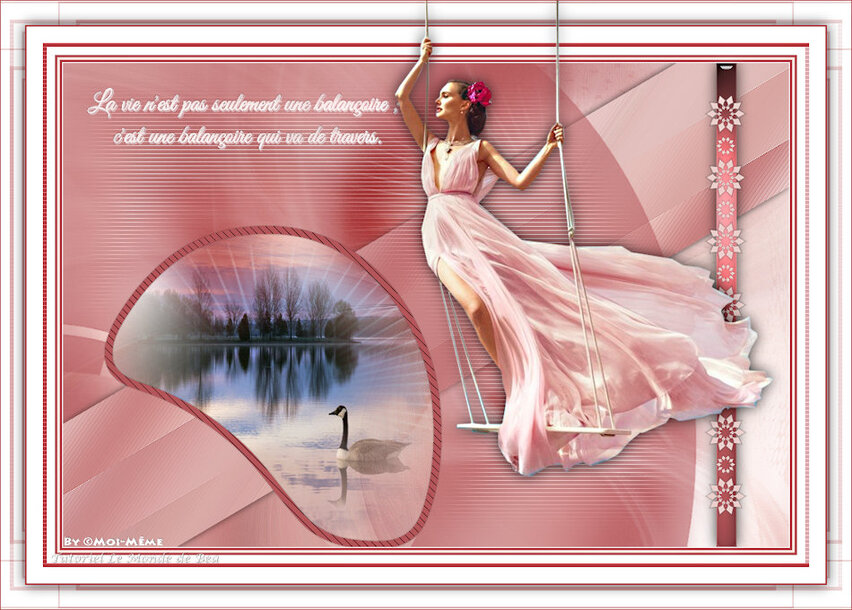
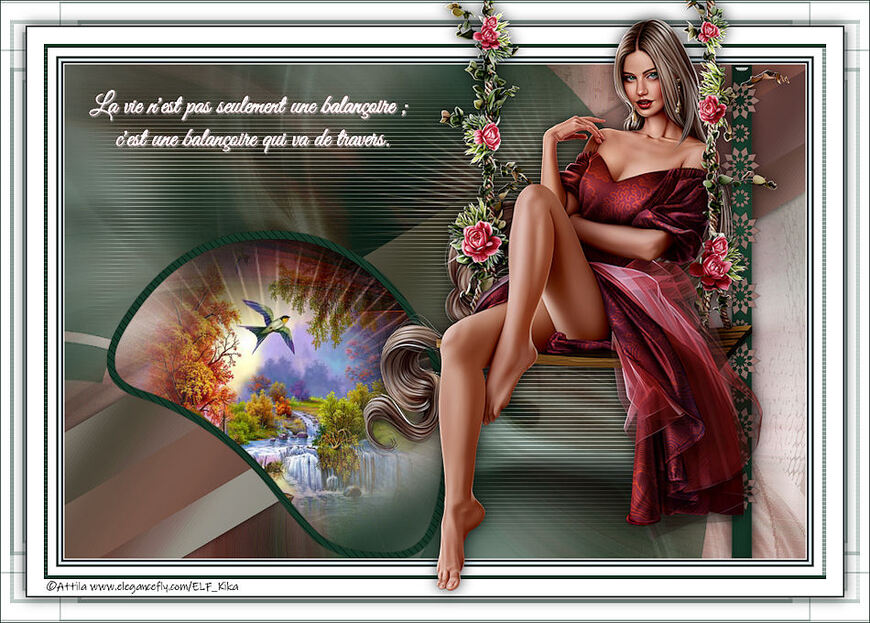
My version, tube by Jessica, Thank you

Original colors:

put the colors
Foreground: #ffe8e2
Background: #b45559
1.
Load the file Alpha_Balancoire2022
window/ duplicate
close the original and work on the copy
2.
Effects , plugins: Mehdi - Wavy lab 1.1 , white color fourth position

Adjust, blur, gaussien, radius at 283.
Layers, new raster layer
Selections, Select allLoad the woman tube
Edit/ Copy
* on your work: Paste into selection
Selections, select none4.
Effects, Image effects, seamless tilling, Setting: Default
Adjust, Blur radial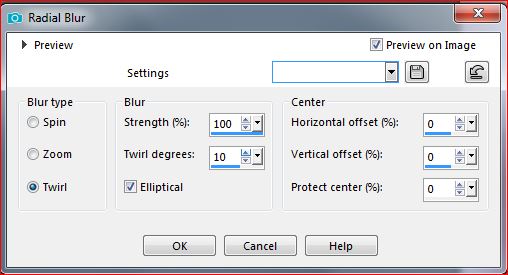
Effects, Edge effects, enhance more
Layers, merge down5.
Load the mask NarahsMasks_1714
Layers, new raster layer
Preencher com a color 2 (dark color)
Layers, new mask layer from image:

Layers/Duplicate
Edit/ Repeat duplicate

Layers, merge group
6.
Layers, new raster layer
Selections, load a selection from alpha channelload sélection 1

Load the landscape (misted)
Edit/copy
* Edit/paste into selection
Layers, arrange, move downkeep selected
7.
On the top layer
Add a new raster layer
Sélections, Modify, select the selection borders :
Fill with color 2
Effects, plugins: AP Lines - Silverlining:
Selections, select none
Effects 3D drop shadow 0 / 0 / 50 / 2 , black8.
On the Group Raster 2 layer (layer below)Selections, load a selection from alpha channel
Load sélection 2
Effects, plugins: Carolaine and Sensibility , cs-texture , how to opening
Adjust, sharpness, sharpen more
Edit/repeau sharpen more
(the next selection overrides the previous one, if not, remove the selection)
9.
On the Raster 1 layerSelections /Select all
Selections, modify, contract at 100
Selections , promote selection to layer
Effects, distortion effects, pixelate: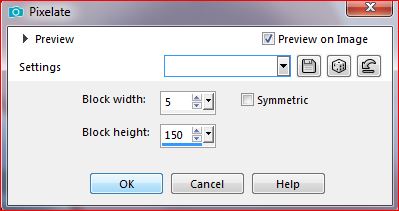
Effects, edge effects, enhance more
Effects 3D drop shadow 0 / 0 / 75 / 25 , black
Select none10.
Effects, geometric effects, skew: vertical/ at 45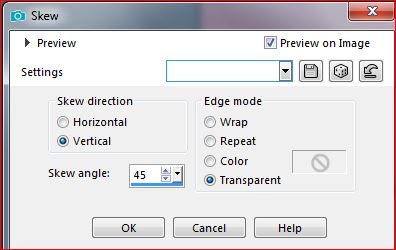
De novo : geometric effects, skew: Horizontal at 35

11.
Selections, load a selection from alpha channel: load sélection 1
DELETE
select none12.
On the Raster 1 layerAdd as new raster layer
Fill in black
Load the mask NarahsMasks_1734
Layers, new mask layer from image:

Layers/duplicate
Merge group
Layers, propreties, Blend Mode, Overlay, or adapted to your colors13.
Layers :
14.
On the Raster 1
Add a new raster layer
Fill in whiteLoad the mask NarahsMasks_1733
Layers, new mask layer from image:
Image, Mirror horizontal
Merge group
Blend Mode , screen
On this layer, load from alpha, again, the sélection 1
DELETE
Select none15.
On the top layer
Add a new raster layer
Selection tool "S" - custom selection:
Fill with color 2
Effects, plugins:Graphic Plus - Cross Shadow, how to opening
Alien skin eye candy 5 Impact - Glass - Settings: Clear, No Drop Shadow
Effects 3D drop shadow 0 / 0 / 75 / 25 black
Select none16.
On promoted selection layer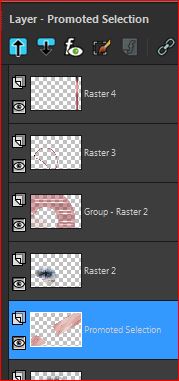
Layers/ Duplicate
Effects, reflection effects, Kaleidoscope:
Image, resize at 20% all layers desmarcado
Layers, arrange, bring to top17.
Ativar a pick tool "K" , place it:
Position X 794Position Y 40
M Key to remove selection18.
Effetcs, plugins: Mura's Meister - Copies
Selections, load a selection from alpha channel
Load sélection 3
DELETE/several times
Select none
Objetcs, Align, Vertical center
or: pick tool "K" :
Position X 782Position Y 12
( M)19.
Load the texte tube
Selections, Select all, float, defloatFill with color 2, or of your choice
Edit/ Copy
* paste as a new layer
place with the pick tool "K" :
Position X 30
Position Y 30
( M)
Effects 3D drop shadow 1 / 1 / 50 / 2, white20.
Image, Add borders, symmetric:
1 px white
3 px color 2
3 px color 1
3 px color 2
10 px white
5 px color 221.
With the magic tool, select 5 px borderEffects, plugins: Carolaine and Sensibility - Cs-texture , how to opening
Select none22.
Image, Add borders, symmetric:
20 px white
2 px color 2Select all
23.
Image, Add borders, symmetric: 30 px white
Selections/Invert
Effects, plugins: Unlimited, &<Bkg Designer sf10 I> Cruncher , how to opening
Selections/Invert
Effects 3D, drop shadow 0 / 0 / 75 / 25 black
Select none24.
Carry the tube woman "on the swing" , copy* paste as a new layer
Image, Resize : adapt to your tube, all layers unshecked
put like on the final example
Effects 3D drop shadow , as before
Adjust, sharpness, sharpen25.
Sign and attach the author's watermark
26.
Image, Add borders, symmetric: 1 px color 2
Resize width at 950 px , all layers ckecked
Adjust, sharpness, unsharp mask, setting: softSave as jpeg
Thank you for following my translation
Thank you KIKA
 votre commentaire
 Suivre le flux RSS des articles de cette rubrique
 Suivre le flux RSS des commentaires de cette rubrique
Inédits de ma conscience


