
-
Par ©Moi-Même le 12 Novembre 2023 à 21:23

This tutorial is by Béa

Thank you Béa, for allowing me to translate your tutorial
This tutorial is protected by copyright
The material provided is protected by the authors of the tubes
It is prohibited to appropriate or modify the original and / or signatures.
Any dissemination without written authorization is prohibited.
Original Tutorial: On here
Material: On here
My version: (colors and images different from the original) image AI (Pixabay) tubed by Moi-Même

Attention:
Author's note: For the beginning of the tutorial (point 3), use the image provided (jpg)
Or
You can choose another png as the main tube (winter woman)
add a background with your colors, merge and save as jpg
Your image must be larger than 1000px
Plugins:
Alien skin eye Candy 5 , Impact
Mura's Meister
Graphic Plus
Guide:
1.
Original colors:

Foreground: Color 1 #3d4d64 (dark)
Background: Color 2 #c3d4de (clear)2.
Load the file Alpha_Givre
Window/Duplicate
Close the original, work on the copy3.
Load the image IA provided
Edit/copy
*On your work : Selections , select all
Edit/paste into selectionSelections , select none
Adjust, Blur, Radial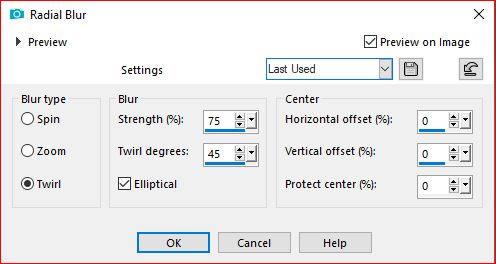
Effects, Edge effects, enhance more
4.
Layers, new raster layer
Fill in color 1
Load the mask NarahsMasks_1711Layers new mask layer from image:

Layers, merge groupe
User defined filter - Emboss 3
Effects 3D drop shadow 1 / 1 / 50 / 1, Color 1

Repeat the same drop shadow, change the color to white
5.
On the Raster 1 layer
Edit/paste as a new layer (the memorized image)Note : If your image doesn't fill the layer - resize. Your image must be larger than 1000px
Adjust, sharpness, sharpen
Layers, properties, blend mode Multiply - Opacity at 75 (adapt according to your image and colors)
Author's result :

6.On the Raster 1 layer
Selections, select all
Image , crop to selection7.
Load the tube Fantasy46 de Colybrix (or yours)
Edit/ Copy
On the top layer (mask)
Selections , Load a selection from alpha channel, sélection 1
Edit/paste as a new layer (see the final image)
Place within selection
Selections/Invert
DELETE
Selections, select none
(if you use this same tube: with the Eraser tool, erase the woman's fingers )8.
Layers, arrange, move down
On the layer above (mask)
Layers, merge down9.
File, new image, transparent: 900 x 600 pixelsSelections, select all
On the initial jpg image, copy
On the new image, paste into selection
Selections, select none
Effects geometric effects, circle: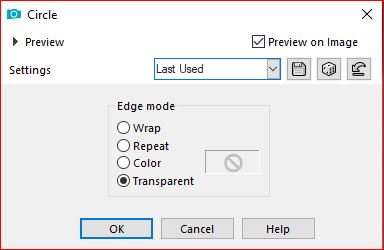
Image/Resize at 50% , all layers unchecked
Edit/repeat resize
E ainda: Image/Resize a 75%, all layers unchecked
Adjust, sharpness, sharpen10.
Effects , plugins: Alien skin eye Candy 5 Impact , Glass , Setting: Clear
Edit/copy
*Return to your original workPaste as a new layer
Effects, plugins: Mura's Meister - Copies:Author's result

11.Objects, Align, Center in canvas
Or with the pick tool "K key" , place it:
Position X 4
Position Y 4
( M key to deselect)
Effects 3D drop shadow 0 / 0 / 60 /30 black12.
Load the Deco_icicles
Edit/copy
*paste as a new layer
Layers, arrange, move down
Duplicate more times and place under the circles, as you wish.13.
Load the icicles
Edit/copy
*paste as a new layer
Place it at the top (don't hesitate to place it a little higher)
Blend Mode, soft light
Layers/Duplicate14.
Load the file flocons.pspimage
Edit/Copier
* paste as a new layer
The layer's blend mode is already in Lighten / opacity at 35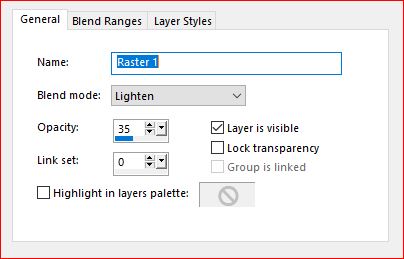
With the pick tool "K" , place it:
Position X 38
Position Y 7
(M)15.
On the Raster 1 layer, copy
Edit/paste as a new image16.
On your work
Image, Add borders, symmetric:
1 px white
3 px Color 1
3 px Color 2
3 px Color 1
10 px white
Select all
Image, Add borders, symmetric: 40 px white
Selections / Invert
Edit/paste into selection (memorized raster 1 image )
Effects, plugins: Graphic Plus, Cross shadow, how to opening
Selections/Invert
Effects 3D , drop shadow, as before
Edit/repeat drop shadow
Selections, select none17.
Image, Add borders, symmetric:1 px Color 1
30 px white18.
Load the title " titre", copy
*paste as a new layer19.
Sign and add the author's watermark20.
Image, Add borders, symmetric: 1 px Color 1
Image, Resize width at 1000 px
Adjust, sharpness, unsharp mask, setting: softSave as jpeg

 votre commentaire
 Suivre le flux RSS des articles de cette rubrique Suivre le flux RSS des commentaires de cette rubrique
Inédits de ma conscience
-
O crédito das imagens utilizadas
pertence ao devido Autor
Os meus tutoriais e traduções são protegidos por:

Interditos de qualquer difusão sem a minha autorização
Agradeço o respeito por o meu trabalho.

-


