
-
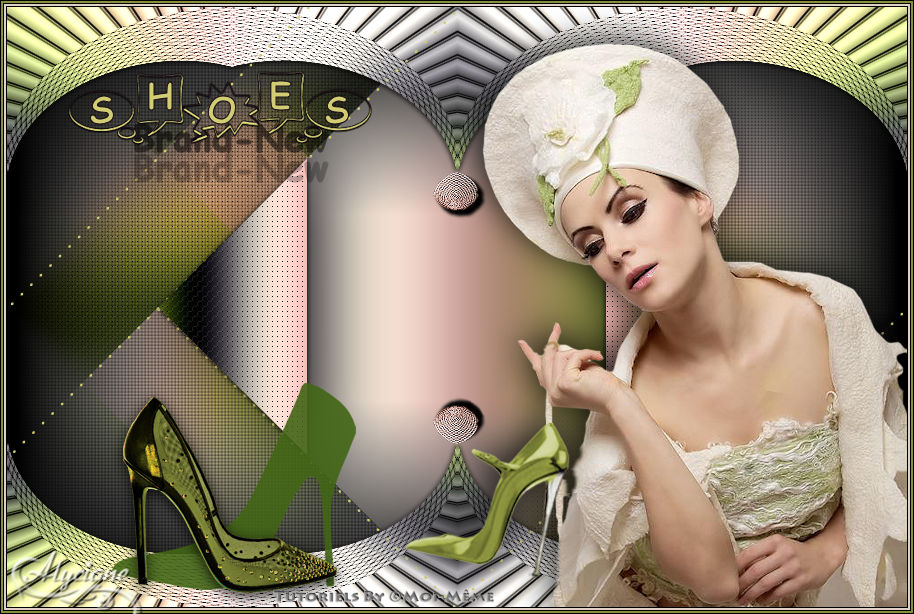
Brand new shoes (GB)
Brand new Shoes

This tutorial is my creation, any resemblance to any other tutorial is pure coincidence.
Prohibited from sharing without my permission.
Autorisações/premissão
Tubes, masks, backround, décos ,WA
Plugins :
On Here
Credit for the images used belongs to the author
My tutorials are protected by:

Tubes:
Tube by Azalée
déco shoes: png free
Thank you!
WA et décos : by Moi-Même
others to perform during the tutorial
Unlimited:
Bkg Designer sf 10I
VM toolbox
______________
Mehdi, wavy lab 1.1
Simple, Blintz
Alf’s Border FX, Mirror Bevel
General preparation: Before starting one of my tutorials
This tutorial was created with PSP 2020, can be done with previous versions,
The alpha channel is compatible with pSP7
If you can't open alpha channel: Place the selections in your PSP selections folder
Place the PSP scripts and gradients in the corresponding "regulated" folder.
Most of my filters are in Unlimited, check the filter folder, some work outside of it.
Open the mask on the PSP.
Duplicate the material and work on the copies.
Remove signatures from tubes before use
Double click on presets
 , they will be installed automatically
 You can adapt the colors, the Blend mode of the layers, to your work

Material:

Initial dimensions 900x600 px
Put the pattern in the corresponding folder on your PSP (if you don't have it)
Open the main tube, choose its 4 colors
As minhas cores :

color 1, #d2cd73
Background/ color 2, #933c54
Color 3 #84808b
Color 4 #1c1019
1/
In Materials, put the color 4 as Foreground

Load the canal alpha Shoes
fill with color 4
2/
Put color 1 as Foreground and color 2 as Background

Layers, new raster layer
Effects, plugins : Mehdi, wavy lab 1.1: In Mode, put color 3 in box 3 and color 4 in box 4

Effects, plugins : Simple, Blintz
Edit repeat Blintz
Image, mirror, mirror vertical
Effects, plugins : (Simple) Blintz
Edit, repeat Blintz
3/
Selections, load a selection from alpha channel, sélection 1
Selections, promote selection to layer
Layers , duplicate
Effects, plugins : Alf’s Border FX, Mirror Bevel, how to opening

Selections, select none
4/
Selections, load a selection from alpha channel, sélection 2
DELETE
Select none
Effects textures, weave: white and black

Effects 3 D drop shadow, 1/0/100/8, black
6/
On the layer raster 2
Selections, load a selection from alpha channel, sélection 3
promote selection to layer
Adjust, blur, gaussien blur , radius at 35
Select none
Effects, Image effects , seamless tilling, how to opening
Effects, Textures, weave, as before
Layers, propreties , Blend Mode , hard light
7/
On the layer above (promoted selection)
Image, resize at 80 %, all layers unshecked
Effects, plugins:
Unlimited: Bkg Designer sf 10I , corner half wrap:

Unlimmited: Bkg Designer sf 10I, Crosstitch: size at 6, transparency at 0

Effects , distortion effects, polar coordinates:

Effects, plugins : (Unlimited) VM Toolbox, Instant tile : 77/31

8/
Selections, load a selection from alpha channel, sélection 4
Edit, Cut
Edit, paste a new layer
Select none
9/
selection tool (S) custom Sélection :


DELETE
Select none
Effects 3D drop shadow: 5/5/100/5 black
Image, resize at 70%, all layers unshecked
Adjust, sharpness, sharpen
put with pick tool K (K key to activate)
Position : X 426, Y 154
(M Key to deactivate the pick tool)
10/
On the layer below
Effects 3 D , drop shadow 1/0/100/8 preto
11/
On the layer raster 2
Effects, plugins :
Unlimited: VM toolbox , softborder, transparency at 0:

Selections, load a selection from alpha channel, sélection 5
Effects, texture effects, texture: select the pattern "Grille, or grid" (Corel_15_006.bmp)

Remover a seleção
12/
Sobre a layer acima
Carregar a déco 1/Copy
sobre o seu trabalho: paste as a new layer
colocar com a pick tool k
position: em negativo: X -15, V -24
desactivar a pick tool
(para alterar a cor: com a ferramenta color changer, pinte com a cor 1)
13/
No topo das layers
Juntar uma nova layer
Selections, load a selection from alpha channel, sélection 6
(Esta seleção pode ser alterada por outros "stickers" fornecidos,
EX: da minha versão 2: selecionar tudo, float, nova camada, preencher com a cor de sua escolha, opacity a 90)
Fille tool , opacity a 90
Preencher com a cor 4 (ou a que escolheu)
colocar a opacity da fill tool a 100
remover a seleção
14/
Image, resize a 80%, all layers desmarcado
colocar com a pick tool K:
position: X 104, Y 376
15/
Load the tube personage (woman) /Copy
on your work: Paste as new layer
Place on the right how about the example (or, Objects, align, right)
Effects 3D drop shadow: 4/-4/ 80/50/black
16/
Load the WA_titre_TA/Copy
on your work: Paste as new layer
Place using tool K:
Position: X 60, Y 63
deselect tool
(adapt color: changer color tool , color 1)
17/
Copy/paste as a new layer, the tube Shoes déco 2
(Or the one of your choice)
place it as in the final example
18/
Sign and add my signature
19/
Image, Add borders, symmetric:
1 px color 4
2 px color 1
1 px color 4
2 px color 2
1 px color 4
20/
Save as JPG/jepg

My version 2: Babette tube, Kahlan shoe, Thank you!

Merci Alyciane pour avoir testé ce tuto
Merci Béa pour avoir testé ce tuto

Merci Anja pour ses traductions NL et D


Your versions will be posted, following the original tutorial
-
Commentaires
Inédits de ma conscience
-
O crédito das imagens utilizadas
pertence ao devido Autor
Os meus tutoriais e traduções são protegidos por:
Interditos de qualquer difusão sem a minha autorização
Agradeço o respeito por o meu trabalho.

-


