-
Martine (GB)
Martine
This tutorial is by Béa

Thank you Béa, for allowing me to translate your tutorial
This tutorial is protected by copyright
The material provided is protected by the authors of the tubes
It is prohibited to appropriate or modify the original and / or signatures.
Any dissemination without written authorization is prohibited.
original tutorial> on Here
My version: Frankie's tube, thanks !!

Original color palette supplied in the material
My colors:

Material> On here
Plugins:
Mehdi, Unlimited , Mura's Meister, Carolaine and Sensibility, AP Lines
Preparation:
Open the Mask (2 x) on your PSP
1.
Foreground color 1
Background color 2
2.
Load the Alpha_Martine
Duplicate
Close the original
let's work on the copy
3.
Effets - Mehdi - Wavy lab, white and black as two last colors

Adjust, Blur, gaussien blur, radius a 35
4.
Add a new layerFill in white
Layers, new mask layer from image:
Mask Lia-sinedot-2

Duplicate
Merge group
Effects, image effects , seamless tilling, setting: Default
Effects 3D drop shadow 0 / 0 / 100 / 30 Black5.
Layers, Merge downDuplicate this layer
plugin: Carolaine and Sensibility , CS-LDots : 110/3/2
6.
Add a new layer
fill with color 2
Layers, new mask layer from image:Mask VSP261

Effects, edge effects, enhance more
Merge Group
7.
Image effects, seamless tilling, side by sideDuplicate this layer
Image, Mirror, horizontal
Merge down
Adjust, sharpness, shapen more
3D effects, drop shadow 2 / 2 / 50 /2 Black
8.
Add a new layer
Selections , load a selection from alpha Channel
Load: sélection 1
fill in WhiteSelections, Modify, Contract de 15
fill with color 2
Contract at 10
DELETE
select noneEffects, edge effects, enhance more
9.
Load the tube womanEdit/ Copy
About your work : Edit/ Paste as a new layer
Resize at 50%, then, resize at 75%, all layers unshecked
Image, Mirror, mirror horizontal
10.
Place, correctly, on the frame
Duplicate the frame
Layers , Arrange, bring to top
Activate the Freehand selection tool, select the top of the table as in the print below
DELETE

Select none11.
Layers, Merge down 2 times
Adjust , sharpness, sharpen3D effects, drop shadow, 0 / 0 / 100 / 30 black
12.
Duplicate this layer
Image, Mirror, mirror horizontal
Resize a 40% all layers unshecked
Effects, image effects, offset:

Duplicate this layer
Effects, image effects, offset:

Duplicate this layer
Image effects, offset as previously
Merge down 2 times
Adjust , sharpness, sharpen
13.
Activate to copy of raster 1
Add a new layer
Selections , load a selection from alpha Channel
Load : sélection 2
fill with color 1
Effects, plugins: AP Lines , Silverlining :

Edge effects, enhance more
select none
Effects, plugins: Unlimited (or outside Unlimited) : Toadies - what are you ?
X-dose, a 10
Y-dose, a 0
Sharpness, sharpen more
3D effects, drop shadow as previously
14.
Selections , load a selection from alpha Channel
load : selection 2
Add a new layer
Fill in white
Select none
15.
Layers, merge downDuplicate
Image effects, offset:

DuplicateImage, Mirror , mirror horizontal
Merge down, 2 times
16.
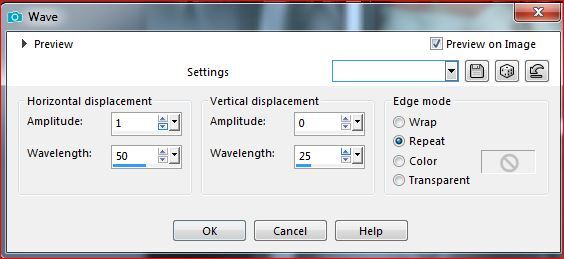
Duplicate this layerEffects , distortion effects, Wave

Layers, arrange, Move down
Blend Mode, hard light
Repetir distortion effects, wave, as previously
17.
Print of current layers

18.Activate the top layer of the layers
Copy/paste as a new layer the Deco 1
Ativar a Pick tool K , put on:
Position: X 436, Y 0
19.
Copy/paste as a new layer the Deco 2Ativar a Pick tool K, put on:
Position: X 126, Y 2
M key to deselect
20.
Activate the raster 1Bring to top
Effets , plugins, Mura's Meister , Perspective Tiling

21.
Copy/paste the tube: Titre.png
Ativar a Pick tool K, put on:
position: X 204, Y 30
22.
Image, Add borders, symmetric checked2 px White
3 px color 1
2 px White
3 px color 2
2 px White
5 px color 2
20 px White
1 px color 2
35 px White
23.
Activate the magic wand tool, select the 35 px border
Effects, Plugins: Unlimited , Bkg Designers sf10, Cruncher how to opening
Edit, repeat Unlimited ( Cruncher)
24.
Selections, Invert3D effects, drop shadow 0 / 0 / 50 / 50 black
select none25.
Sign your work and place the author's watermark
26.
Image, Add borders de 1 px color 2Resize , width a 950 px all layers checked
Sharpness, unsharp mask, setting: Soft

save as jpeg

-
Commentaires
Inédits de ma conscience


