
-
Printemps 2021 (GB)

This tutorial is by Béa

Thank you Béa, for allowing me to translate your tutorial
This tutorial is protected by copyright
The material provided is protected by the authors of the tubes
It is prohibited to appropriate or modify the original and / or signatures.
Any dissemination without written authorization is prohibited.
Original Tutorial: On Here
My version according to the original: misted by Moi-Même , the rest is from the material, thanks

My version, tube by Riet , Thank you, misted from me

Material:On Here
Plugins:
Unlimited : Unlimited , Bkg Designer sf10 I
Alien skin Eye Candy 5 Impact
Corlors:
Original color palette supplied in the material
color 1: #ffffff
color 2: #fabe22
my color 3: #81bfea
1.
Load the Alpha_Printemps2021
Window/Duplicate
Close the original, work on the copy
2.
Load the woman tube
on this one, choose 2 colors
Remove sign
Edit/copy
On your work: Selections, Select all
Edit/paste into selection
Selections, select none3.
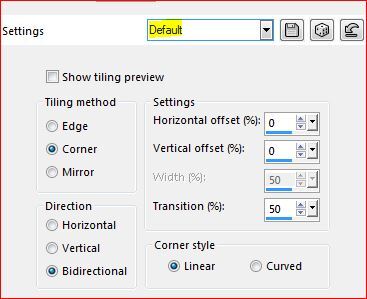
Effects, Image effects, seamless tilling, Settings: Default:
Adjust, Blur, radial:

Effects plugins, Mehdi , Weaver:

Layers, duplicateLayers, merge all
4.
Right-click on the layers palette (Materials): promote background layerEffects, edge effects, enhance more
5.
layers, new raster layer
fill with color 1
Layers, New mask layer from image:

Effects, edge effects, enhance more
Merge group
6.
On the layer Raster 1Load the landscape
Edit/copy
On your work: paste as a new layer
Resize at 85% , 2 times, all layers unshecked (adapt to your landscape)
7.
Selections, Load a selection from alpha Channel, sélection 1
DELETE
8.
Selections /InvertSlections, Modify, Select the selection borders :

9.
layers, new raster layer
fill with color 2
Effects, textures, Weave, color 2 and color 3 of your choice:

Effects, edge effects, enhance more
Select none
Effects 3D drop shadow: 5/5/75/35 black
You can choose to place this small frame on top of the stack or leave it where it is
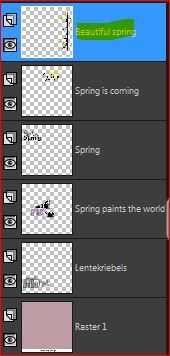
10.Current Layers:

11.On the top of layers
Load the tube Deco_fleurs
Edit/copy/ paste as a new layer
With the pick tool K ( K Key to activate), put:
Position X 30
Position Y 10
( M Key to remove the selection of the pick tool K)
12.
Activate the changer color tool, Right click to apply color 2
13.
Load the file LF-WordArt-Springcopy the first word art, it is already active
Edit/copy/paste as a new layer
Resize a 85% all layers unshecked
Objets ,Align, right
(you can use any word art you want , resize if necessary)
14.layers, new raster layer
fill with color 1
Layers, New mask layer from image

Duplicate
Effects, edge effects, enhance more
Merge group
15.
Layers propreties, blend mode, screen
Layers, Arrange, move down , 2 times
16.
Current Layers :
17.
Image, Add borders, symmetric:
1 px White3 px color 2
10 px White
5 px color 2
10 px White18.
With the magic wand tool, select the edge of the 5 pxEffects, textures, weave, as before
Edge effects, enhance more
Select none
19.
Image, Add borders : 3 px , color 2
Select all
Image, Add borders: 25 px , White
Selections/InvertEffects, plugins: Unlimited , Bkg Designer sf10 I, Cruncher:

Edge effects, Enhance more
Selections /Invert
Effects 3D drop shadow 5 / 5 / 75 / 25 blackrepeat in negative -5 / -5 / 75 / 25 black
Select none20.
On the woman tube
Image, Miroir horizontal
Edit/Copy
on your work: paste as a new layer
Resize a 85% all layers Unshecked
Objects , Align , leftObjects, Align, Bottom
Effects plugins: Alien skin eye Candy 5 Impact - Perspective shadow:
21.
Sign your work and add the author's watermark22.
Image, Add borders : 1 px color 2
Resize width at 950 px all layers checkedAdjust, shrapness, sharpen :

Save as jpeg
-
Commentaires
Inédits de ma conscience
-

O crédito das imagens utilizadas
pertence ao devido Autor
Os meus tutoriais e traduções são protegidos por:

Interditos de qualquer difusão sem a minha autorização
Agradeço o respeito por o meu trabalho.

-


