
-
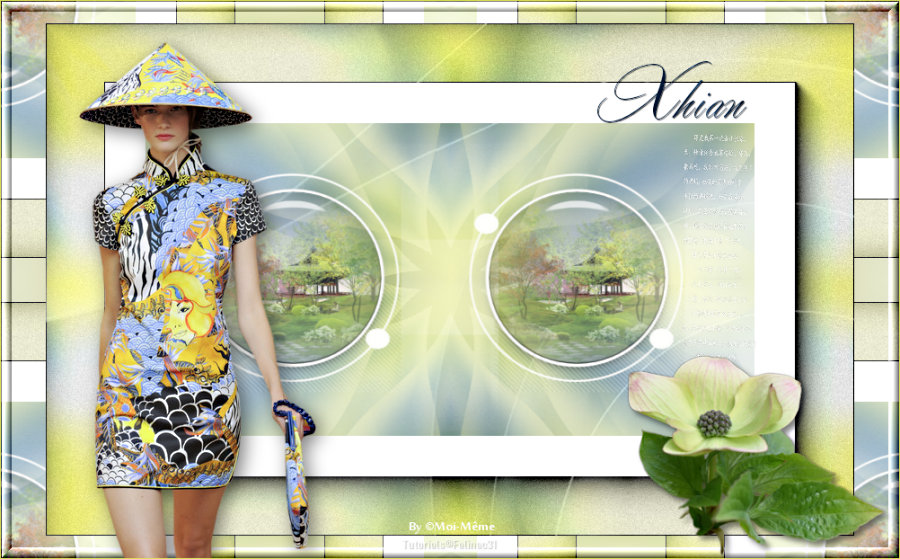
Xhian


Xhian
Este tutorial é da autoria de FelineC31.
Obrigado pela confiança para a tradução deste tutorial.
Nota da Autora :
É proibido copiar, distribuir no web , de o modificar, mudar o nome,
propor em grupos, retirar o watermark ou alterar os tubes fornecidos, oferecer em blog/forum.
Os tubes são oferecidos para uso pessoal, para os utilizar nos vossos tutoriais e junta-los ao material, tem que ter a autorização dos respectivos autores.
Tutorial original AQUI
Material AQUI
Versão conforme ao original:

A minha versão, tube de Castorke, flôr de Animabelle, obrigado:
Plugins:
Mehdi/ Wavy Lab 1.1
Pluging Galaxy/Intant Mirror
Flaming Pear/ Flexify 2
AAA Frames/ Foto Frame
Alien Skin Eye candy 5 Impact/ Glass / Clear
Graphic plus/ Quick Tile II
Unlimited / Buttons & Frames / 3D Glass Frame 2
Cores originais: paleta forncida com o material

Colocar as cores:

Roteiro:
1-File, new, transparent , 900/570 px
2-Effects, plugins: Mehdi/ Wavy Lab 1.1

3-Effects, image effects seamless tilling:

4-Layers, dupicate
5-Image, Mirror, mirror Horizontale
6-Layers, propreties, opacity a 50
7-layers merge down
8-Effects, plugins: Pluging Galaxy,Intant Mirror

9-Layers, duplicate (duplicar esta layer)
10-Effects, plugins: Flaming Pear/ Flexify 2

11-Effects, Distortion effects, polar coordinates:

12-Layers, duplicate
13-Image, Mirror , mirror Verticale
14-layers, merge down
15-Effects, Reflection effects, Kaleidoscope:

16-ffects, Image effects, seamless tilling, setting: default
17-Blend mode, soft light
18-merge all
19- Effects, plugins: Filtre AAA Frames, Foto Frame:

20-Selections, select all
21-Selections, Contract de 65
22-Selections, Invert
23-Adjust, add/remove noise, add noise:

24-Selections, select none (remover a seleção)
25-carregar o png déco 1, copy
26-sobre o seu trabalho, paste as a new layer
27-Ativar a magic wand tool
28-Selecionar o interior do circulo
29-Carregar o misted paisagem, copy
30-Paste as a new layer
31-Image, resize a 65%, all layers desmarcado
32-Colocar com a move tool (M) se necessàrio
33-Selections, Invert
34-DELETE
35-Selection, Invert (de novo)
36-Effects, plugins: Alien Skin Eye candy 5, Impact, Glass, com estes dados, cor branca:

37-Remover a seleção
38-Layers, arrange, move down
39-Ativar a layer acima
40-Layers, merge down
41-Image, Resize a 80% all layers desmarcado
42-Ativar a pick tool (letra K)
43-colocar, Position: X 71 / Y 134

(Letra M para remover a pick tool)
44-Duplicar esta layer
45-Ativar a pick tool (letra K)
46-colocar, Position: X 387/ Y 134
47-Carregar o mask -Narah_mask_0604
48-Ativar a layer raster 1
49-CJuntar uma nova layer
50-Preencher de branco
51-Layers, new mask layer from image :

52-Layers, merge group
53- Blend mode, Luminance (legacy)
54-Carregar o tube texto (texte), copy
55-paste as a new layer
56-Ativar a pick tool (letra K)
57-colocar, Position: X 678/ Y 120
(letra M)
58-Layers, merge visibles
59-Selections, select all
60-Image, add borders, symmetric desmarcado, cor 3:

61-Effects, Image effects, seamless tilling, setting: default
62-Selections, Invert
63-Adjust, blur, Gaussien , radius a 30
64-Effects, plugins: Graphic plus, Quick Tile II:

65-Remover a seleção
66-Effects, plugins: Unlimited, Buttons & Frames , 3D Glass Frame 2:

67-Carregar o tube mulher (remover a assinatura), copy
68-Paste as a new layer
69-Image, Resize a 75 % all layers desmarcado
70-colocar comomo no exemplo final
71-Effects 3D , drop shadow 5/5/50/30 preto
72-carregar o tube flôr , copy
73-paste as a new layer
74-Image, Resize a 45% all layers desmarcado
75-colocar como sobre o exemplo
76-Effects 3D, drop shadow 5/5/50/10 preto
77-carregar o tube titulo" Titre Xhian", copy
78-paste as a new layer
79-Ativar a pick tool (letra K)
80-colocar, Position: X 664 / Y 67
81- assinar, colocar o watermark da autora
82-Image, add borders, symmetric: 1 px cor 4
83-Image, resize width a 900 px
Salve

-
Commentaires
Inédits de ma conscience
-
O crédito das imagens utilizadas
pertence ao devido Autor
Os meus tutoriais e traduções são protegidos por:

Interditos de qualquer difusão sem a minha autorização
Agradeço o respeito por o meu trabalho.

-


