-
Givre 2024 (eng)
Givre (2024)
This tutorial is by Béa
Thank you Béa, for allowing me to translate your tutorial
This tutorial is protected by copyright
The material provided is protected by the authors of the tubes
It is prohibited to appropriate or modify the original and / or signatures.
Any dissemination without written authorization is prohibited.
Tutorial translated with PSP 2019

Original tutorial: On here
Version conforming to the original:

My version, personal tube, others from the material

Material:On here
Guide:
1.
Colors:
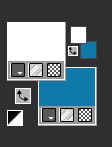
Foreground: White
Background, color 2: #1079a9
2.
Load the file Alpha_Givre2024
Window/ Duplicate
Close the original , continue on copy3.
Prepare a colors gradient:(gradient, foreground/backgroung, linear)
Fill with gradient

Effects, plugins: Filters Unlimited - &<Bkg Kaleidoscope> Nomads Rug

Layers, merge all
4.
In the layers palette, right click, promote background layer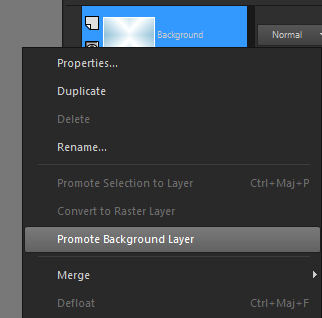
5.
Adjust, add noise :
Adjust, sharpness, sharpen more
6.
Layers/Duplicate
Image, Resize, at 85% (if not reported, it is always all layers unchecked)
Effects 3D, drop shadow: 0 / 0 / 75 / 25 black
7.
Effects, Image effects, seamless tiling, Default:
Effects 3D , drop shadow, as before (memorized)
Layers, merge down8.
Layers/ Duplicate
Effects, plugins: Mehdi - Sorting Tiles
Layers, properties, Blend mode Multiply - Opacity at 68

9.
Result:
10.
Layers, new raster layer
Load the image "Fond_givre" (leave it open on your PSP for later)
Edit/Copy
*On your work: Selections, select all
Edit/paste into selection
Selections, select none
Layers, properties, Blend mode, soft light
Adjust, Sharpness, sharpen more11.
Load the Element_Deco_Givre_01 tube
(remove signatures from tubes before using them)
Edit/Copy
*Paste as a new layer
Image, Resize at 50%
Activate the pick tool "K", place:Position X 200
Position Y 49
(M key to uncheck)
12.
Layers, new raster layer
Selections, load a selection from alpha channel, sélection 1
Fill with gradient
Adjust, blur, gaussien at 20
Adjust, add noise, as before
13.
Layers, new raster layer
Load the misted "Femme Givre" , copy
*Paste into selection14.
Layers, new raster layer
Selections, Modify, Select the borders of selection
Fill in color 2
15.
About the "fond" image you left aside, copyLayers, new raster layer
*Paste into selection
Layers, properties, Blend mode, Luminance (legacy)
Adjust, Sharpness, sharpen
Apply the previous drop shadow (memorized)
Selections, select none16.
Current layers:
Layers, merge down, 3 times

Apply the same drop shadow
17.
On the layer below (the snowflake)
Apply the same drop shadow18.
Activate the layer at the top of the layers
Load the "Glass" tube, copy
*Selections, load a selection from alpha channel, sélection 2
Layers, new raster layer
*Paste into selection
Apply the same drop shadow (still memorized)
Selections, select none19.
Layers, merge down Twice20.
We continue on the top of the layers
Layers/ Duplicate
Activate the layer below
Effects, plugins: Flaming Pear - Flexify 2
Don't move, we will move later
21.
Activate the layer above (top of layers)
Effects , plugins: Flaming Pear - Flexify 2, new data : Mirror ball/retroazimuthal front(personal tip: this parameter is almost at the end of the scroll)

Edit/ repeat Flexify 2
22.Effects, Image effects, offset:

Layers, Duplicate
Effects, Image effects, offset: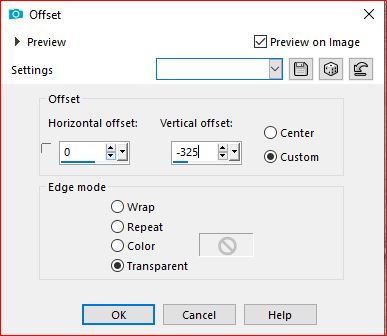
Layers, merge down
Objects, Align,Vertical - center
(or with the pick tool (K): Position X 625 / Position Y 37)
(M)
Effects 3D, drop shadow: 10/-10/100/100 color 2Adjust, sharpnes, sharpen
23.
On the layer below (the original)
Effects, Image effects, offset:
Adjust, Sharpness, sharpen
24.
Layers, new raster layer
Selections, load a selection from alpha channel, sélection 3
Fill with the initial gradient (still memorized)
Adjust, add noise, as before, (memorized)
Adjust, Sharpness, sharpen more
Effects 3D , drop shadow: 0 / 0 / 100 / 100, black
Selections/select none25.
Layers/Duplicate
Effects, plugins: Filters Unlimited - &<Bkg Designer sf10 I> Cruncher :
Layers, arrange, move down
Effects, Edge effects, enhance26.
Activate the layer aboveLayers, merge down
Duplicate
Effects, Image effects, offset:
Layers, arrange move down, Twice (it is under the frame)
I adjusted the position a little, with the pick tool (k)
Position: X 96/Y 0
before:

after:

27.
On the layer Raster 2 (third layer from the bottom)
On the misted "femme givre", copy
* Paste as a new layer
Image, Mirror, mirror horizontal
Layers, properties, Blend Mode, soft light
Adjust, sharpness, sharpen28.
Current layers:
29.
Load the png Deco, copy
*Paste as a new layer
Place with the pick tool "K":Position X 357 / Position Y 0
( M)30.
Load the png Flocons, copy
*Paste as a new layer
Layers, properties, Blend mode, lighten31.
Image, add borders, symmetric:
1 px White
1 px color 2
1 px White
3 px color 2
15 px White
3 px color 2
30 px White32.
Layers, new raster layer
Selections, Select all, modify, contract at 15
Selections, Invert
Fill in color 2
Effects, plugins: AAA Frames - Texture frame:
Adjust, sharpness, sharpen more
Effects 3D , drop shadow 0 / 0 / 75 / 25, black
Select none33.
Sign and add the author's watermark34.
Image, add borders, symmetric: 1 px color 2
Image, Resize width at 950 px
Adjust, sharpness, unsharp mask: soft
Save as jpeg
Translation by:
Inédits de ma conscience


