
-
Je porte ton nom (GB)
Je porte ton nom
(Rosa)

(My version 2 at the bottom of the page: Hortense)
This tutorial is my creation, any resemblance to any other tutorial is pure coincidence.
Prohibited from sharing without my permission.
Autorizações
Tubes, masks, backround, décos ,WA
Plugins :

Aqui
O crédito pelas imagens utilizadas
pertence ao devido Autor
Mes tutoriels sont protégés par:

Tube: by Guismo
Fleur by Wieskes
Masque by Narah
Thank you!
WA , décos : by Moi-Même
Unlimited:
Mac’s
Forest’s filters
______
Ap lines SilverLining
Flaming Pear, flexify 2
General preparation: Before starting one of my tutorials
This tutorial was created with PSP 2020, can be done with previous versions,
The alpha channel is compatible with pSP7
If you can't open alpha channel: Place the selections in your PSP selections folder
Place the PSP scripts and gradients in the corresponding "regulated" folder.
Most of my filters are in Unlimited, check the filter folder, some work outside of it.
Open the mask on the PSP.
Duplicate the material and work on the copies.
Remove signatures from tubes before use
Double click on presets
 , they will be installed automatically
 You can adapt the colors, the Blend mode of the layers, to your work

Material:

On this page, some ideas for flower and people names
En Français: AQUI
Em português: AQUI
In English: AQUI
Initial dimensions: 900x600 px
Colors :

Foreground/cor 1: #ba9599
Background/ cor 2: #502a3c
color 3: #efd4d9
1/
Prepare a gradient radial :

Load the canal alpha Je porte ton nom
fill with color 2
2/
Layers, new raster layer
fill with the gradient
layers, duplicate
Image, mirror, mirror horizontal
Layers, propreties, blend mode, Overlay
Layers, merge down
3/
Selections, load a selection from alpha channel, sélection 1
Promote selection to layer
Selections, select none
4/
Effects, plugins :
Unlimited (or out of him), Mac’s, remove white
Unlimited, Forest’s filters, wallpaper tool:

5/
Selections,lod a selection from alpha channel, sélection 2
DELETE
select none
Effects, Image effects, Seamless tilling, like this :

Effects, edge effects, enhance
Layers, Duplicate
Effects, Image effects, seamless tilling, new data :

Duplicate
Effects, Image effects, seamless tilling, new data :

Effects, plugins: AP lines SilverLining, Dotty Grid:

6/
On the layer below
Effects, plugins: AP lines SilverLining, Barred:

Layers, propreties, Blend mode, screen
7/
On the layer below
Layers propreties, Blend mode, soft light
Result:

8/
close the layer raster 1 (click on the eye in the layers palette)
Layers, merge visibles
Blend Mode , luminance
Open the layer raster 1 (click on the eye in the layers palette)
Layers, merge down
9/
layers, new raster layer
fill with color 1
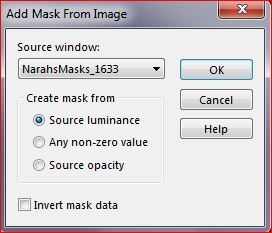
load the mask NarahsMasks_1633
Layers, New mask layer from image :
Duplicate
Merge group
Edge effects, enhance
Blend Mode , Overlay
Effects 3D, drop shadow : 0/0/30/10 black
10/
On the layer raster 1
layers, new raster layer
Selections, load a selection from alpha channel, sélection 3
fill with color 2
layers, new raster layer
Load the misted printemps3_misted MM, or which you choose, copy
On your work: paste into selection
Select none
(sharpness, sharpen if necessary )
12/
On the layer raster 1
Selections, load a selection from alpha channel, sélection 4
Promote selection to layer
Layers, arrange, bring to top
Adjust, blur, gaussien blur, radius at 10
Select none
13/
Effects, plugins : Ap lines SilverLining, barred, as before
Effects, distortion effects, wave :

14/
layers, new raster layer
Image, mirror, mirror horizontal
Image, mirror, mirror vertical
Layers, merge down
Effects, plugins: Flaming Pear, flexify 2 :
(my decoration is in the material if necessary, adapt to your work)

Effects 3 D, drop shadow, as before
15/
Image, add borders, symmetric :
2 px color 2
Selections, select all
16/
Image, add borders, symmetric :
30 px de color 3
Selections, Invert
Effects , plugins : AP Lines SilverLining, Barred , as before
Selections, Invert
Effects 3 D, drop shadow : 0/0/100/30 black
Select none
17/
Image, add borders, symmetric :
2 px color 2
Select all
16/
Image, add borders, symmetric :
30 px color 1
Effects, Image effects, seamless tilling, setting: Default
Selections, invert
Adjust, blur, gaussien, radius at 10
Effects, plugins: AP Lines, SilverLining, Dotty grid as before
Selections, invert
Effects 3 D, drop shadow as before
Select none
17/
Load the tube flor bloemenwieskestube145-vi, (or which you choose)
Image, Resize at 30% all layers unshecked (adapte to your tube)
Place it on the top right as on the final example
Adjust, sharpness, sharpen
Effects, 3D drop shadow : 0/0/60/30, black
17/
Load the tube femme (or which you choose)
Image, resize a 70% all layers unshecked (adapt to your tube)
Sharpness, sharpen
18/
Layers, Duplicate
On the layer below:
Adjust, blur, gaussien, radius at 50
Layers, propreties, Blend Mode, multiply
19/
If you want to use the same name
Copy/paste as a new layer the tube " texte"
place it with the pick tool K:
Position : X 618, Y 64
otherwise:
Copy/paste as a new layer the tube " déco 1" (in material)
Place it with the Pick tool K, as above
with the font (in material) : Uptight
Colors : withe in background and Foreground
Write the name you choose
Adapt the size of the script according to the number of characters, put the text in the center of the tube déco 1
(Optional: efects, image effects, angle and vertical marked as in step 5, delete lower text)
20/
Sign and add my signature
Add borders: 1 px color 2
Resize width at 950 px
Save

A minha versão 2: Tube de Cal, Fleurs de GB, Merci! Misted de moi
(Hortense)

Merci Anja pour les traductions et test de ce tuto

Merci Alyciane pour avoir testé ce tuto

-
Commentaires
Inédits de ma conscience
-
O crédito das imagens utilizadas
pertence ao devido Autor
Os meus tutoriais e traduções são protegidos por:
Interditos de qualquer difusão sem a minha autorização
Agradeço o respeito por o meu trabalho.

-


