-
Joyeuse St Patrick
Este tutorial é da autoria de Cloclo

Obrigado por a sua confiança e o seu pedido para a tradução dos seus tutoriais
Nota da Autora:
É estritamente proibido copiá-lo ou distribuí-lo na web, blogs, forum sem minha permissão por escrito.
Este tutorial foi realisado com corel PaintShop pro 2020
Mas também pode ser realizado com outras versões PSP
Tutorial Original AQUI
Material AQUI
Plugins:
MuRa's Filter Meister / Perspective Tiling 1.1
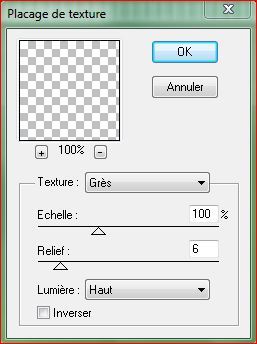
Textures / Placage de texture
Alien Skin Eye Candy 5, Impact
MuRa's Meister
A minha versão: mudei o tube mulher e uma decoração de Guismo, obrigado!

Preparação: clica dupla no preset, elle instala-se automaticamante
Roteiro:
Cores originais:
(paleta das cores fornecidacom o material)

Na paleta materials, colocar as cores:
Foreground/ cor 1
Background/ cor 2
1
carregar o ficheiro Canal Alpha Jour_de_st_patrick , window/duplicate, renomear Raster 1fechar o original, trabalhar sobre a copia
2
carregar a imagem " Fond "
Edit/ Copy
*Sobre o seu trabalho: Selections, select all
Edit/ paste into selection
Selections, select none (remover a seleção)
Effects, Image effects, seamless tilling:

Adjust, blur, Gaussien, radius a 30

3
Layers/ Duplicate (duplicar esta layer)
Image, Resize a 90% , all layers desmarcado

Effects, Image effects, seamless tilling: como antes (memorizado)
Effects, Edge effects, enhance more
Duplicar esta layer
Effects , image effects, seamless tilling:

Layers, merge down
Juntar uma nova layer
Preencher com a Cor 1
Carregar o mask NarahsMasks_1677
Layers, new mask layer, from image:

Effects, edge effects, enhance
Layers, merge group
Effects 3D drop shadow: 0 / 0 / 45 / 30 / Cor 2
Effects, Image effects, seamless tilling: setting Default

Layers, merge down
4
Duplicar esta layer
MuRa's Meister MuRa's Meister , Perspective Tiling 1.1:

Adjust, sharpness, sharpen
Effects 3D drop shadow 0 / 0 / 45 / 30 / Cor 2
Edit/ Repeat drop shadow
Ativar a layer abaixo
Carregar o Mask 2BitMask_34
Juntar uma nova layer
Preencher de branco
Layers, new mask layer from image:

Adjust, sharpness, sharpen more
Layers, merge group
Layers, propreties, Blend mode soft light
Effects 3D drop shadow 0 / 0 / 45 / 30 / Cor 4 (preto)
Duplicar esta layer
Image, resize a 90% , all layers desmarcados
5
Layers, merge down
Juntar uma nova layer
Selections, load a selection from alpha channel, Cloclo1

Preencher com a Cor 2
Effects, plugins: Textures / Placage De Texture
Effects 3D drop sahdow 0 / 0 / 45 / 30 / Cor 4 (preto)
Remover a seleção
Selections, load a selection from alpha channel, Cloclo2
DELETE
Remover a seleção
Ativar a layer Copy of Raster1
Juntar uma nova layer
Preencher com a Cor 2
Carregar o Mask: Masque_19
Layers, new mask layer, from image:

Effects, Edge effects, enhance more
Merge group
Effects 3D drop shadow 2 / 2 / 60 / 10 / Cor 4
6
Preparar um gradient Linear
(cores Foreground/background)

Ativar a layer do topo das layers
Juntar uma nova layer
Selections, load a selection from alpha channel, Cloclo3
Preencher com o gradient
Adjust, blur, Gaussien , radius a 30
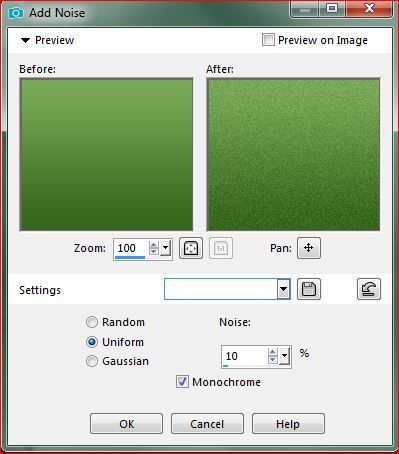
Adjust, add/remove noise, add noise :
Juntar uma nova layer
Effects 3D, cutout: cor 2

7
Carregar o tube paisagem " Paysage" copy
* paste into selection
Remover a seleção
Merge down
Carregar o Tube Déco_Cloclo , copy
* paste as a new layer
Ativar a pick tool (letra K ), colocar
Position: X 0 / Y 45

Letra M para remover a seleção
Duplicar esta layer
Image, Mirror, Mirror Horizontal
Carregar o Tube _Cloclo (remover a assinatura), copy
* paste as a new layer
colocar em baixo à esquerda
(ver o exemplo final para colocar os tubes)
Effects, plugins: Alien Skin Eye Candy 5, Impact, Perspective Shadow:
Aplicar o Preset Shadow_joyeuse_st_patrick
dados basic se necessàrio:

8
Carregar o Tube "Livre", Copy
* pste as a new layer, colocar em baixo à esquerda
Carregar o Tube "Chaussure ", copy
*paste as a new layer, colocar em baixo
Carregar o Tube Femme _Cloclo, copy
* paste as a new layer, colocar à direita
Aplicar o Preset Shadow_joyeuse_st_patrick como antes
Carregar o Tube Louis_d_or , copy
Paste as a new layer, colocar
Carregar o Tube Titre, copy
Paste as a new layer, colocar no topo
Layers, merge visibles
Edit/ Copy
Carregar a moldura " Cadre "
Coma a magic wand, Tolerance a Zero , clica sobre o centro da layer
Edit/paste into selection
Juntar uma nova layer
Effects 3 D , cutout, como antes (dados ainda memorizados)
Juntar uma nova layer
Effects 3 D , cutout, repetir em negativo ( -10/ -10)
Layers, merge Visibles
9
Carregar o Tube Coin Cloclo , copy
Paste as a new layer, não deslocar
Layers, merge all
Assinar e juntar o Watermark da autora
Image, Resize (by pixels), width a 1000 Pixels
Salve em JPG

-
Commentaires
Inédits de ma conscience
-
O crédito das imagens utilizadas
pertence ao devido Autor
Os meus tutoriais e traduções são protegidos por:

Interditos de qualquer difusão sem a minha autorização
Agradeço o respeito por o meu trabalho.

-


Le monde de Béa


La passion de Mel

Le Jardin de Félinec31
Traduções Alyciane e Garances


Click sobre o nome
Cloclo

Barbara de Venise


En Français pour Anja Timmers


En Français pour SimPsp


-
Tubes divers:


-

-