-
Pâques 2021 (GB)
Pâques 2021

This tutorial is my creation, any resemblance to any other tutorial is pure coincidence.
Prohibited from sharing without my permission.
Autorisations
Tubes, masks, backround, décos ,WA
Plugins :

On Here
Credit for the images used belongs to the author
My tutorials are protected by:

Main tube by: Cibibijoux
Misted by Cal
chick by Colybrix
Bunny by Silvie (groupe de partage)
Branches from web
Thank you!
WA et décos, misted : by Moi-Même
others to do during the tutorial
Unlimited:
Bkg Designers sf10IV
______
Artistic
Alien Skin Eye Candy 5 Impact
MuRa's Meister
Ap lines SilverLining
General preparation: Before starting one of my tutorials
This tutorial was created with PSP 2020, can be done with previous versions,
The alpha channel is compatible with pSP7
If you can't open alpha channel: Place the selections in your PSP selections folder
Place the PSP scripts and gradients in the corresponding "regulated" folder.
Most of my filters are in Unlimited, check the filter folder, some work outside of it.
Open the mask on the PSP.
Duplicate the material and work on the copies.
Remove signatures from tubes before use
Double click on presets
 , they will be installed automatically
 You can adapt the colors, the Blend mode of the layers, to your work

Material:
Initial dimensions: 900x600 px
Colors :


AVP/ color 1: #d2e596
ArP/ color 2: #72b391
color 3: #ffffff
1/
Load the canal alpha_pâques 2021
fill with color 2
2/
load the misted landscape, copy
On your work : paste as a new layer
(keep it open on the PSP for the future)
Place on the left :Objects, align, left
Or with the pick tool K (K key to activate):
Position : X 0, Y -100
3/
Layers, Duplicate
Place on the right, objects, align, right
Or with the pick tool K :
Position : X 336, Y -100
( M Key to remove the selection)
Layers, merge down
Effects, Image effects, seamless tilling, setting: Default
Effects, plugins: Artistic (not artistique), colored pencil :

Adjust, sharpness, sharpen
Layers, merge down
4/
Layers, new raster layer
Fill with color 2
Effects, geommetric effects, Perspective-Vertical : 21/transparent

Effects, plugins:
VM toolbox, instant tile, how to open

AAA filters, transparent vignette, how to open:

Ap lines SilverLining , Breaks : how to open

Layers propreties, Blend mode , screen
5/
Selections, load a selection from alpha channel, sélection 1
DELETE
Selections, select none
6/
Load the tube déco 1, copy
On your work : paste as a new layer
Layers, propreties, opacity at 70
(to adapt it to your colors: Place the layer Blend mode on luminance (legacy)
7/
Load the tube déco 2, copy/paste as a new layer
Do not shift
Effects 3 D drop shadow, -1/ 1/80/40 black
8/
On the layer bellow
Add a new raster layer
Selections, load a selection from alpha channel, sélection 2
Effects 3 D, cutout : color black
(or white if your colors are dark)

Effets, plugins : Ap lines SilverLining , GridPaper:
(or how to open if your cutout is white)

Remove the selection
9/
On the layer raster 1 (fundo)
Add a new raster layer
Selections, load a selection from alpha channel, sélection 3
Load the landscape misted , copy
paste into selection
Remove the selection
10/
On the layer raster 1
Selections, load a selection from alpha channel, sélection 4 (egg)
Promote selection to layer
Layers, arrange, bring to top
Effects, plugins : Alien Skin Eye candy 5, Impact, Glass, setting: clear
Remove the selection
11/
Image, resize a 40%, all layers unshecked
Effects, plugins : Mura’s Meister, copies :

Image, resize a 30%, all layers unshecked
Effets, plugins: Alien skin eye candy 5, Impact, Glass, setting: clear
Place it : Objects align, bottom, and, align right
Or with the pick tool K :
position: X 554, Y 528
(do M Key)
Repeat: Alien skin eye candy 5, Impact, Glass, setting: clear
12/
On the layer raster 1
Duplicate
Effects, plugins : Mura’s Meister, perspective tilling :

11/
Load, Copy/paste as a new layer the tube "déco herbe"
Layers propreties, Blend mode , Hard light
place it with the pick tool K :
Position :X 0, Y 481
Layers, arrange, move up 2 times
Blend Mode, Hard light (or other)
Effects , distortion effects, Wave:

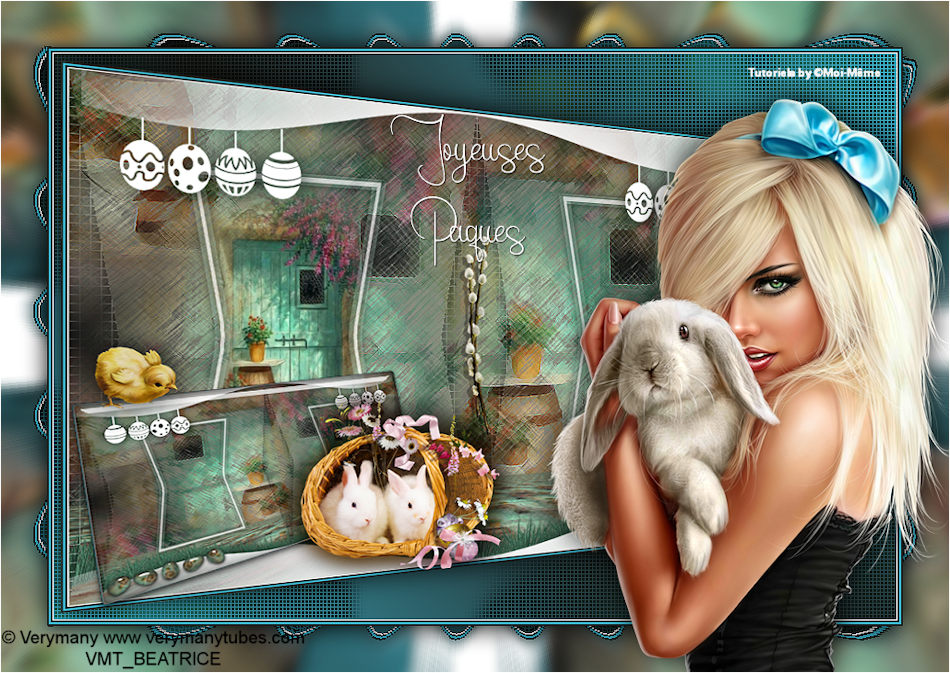
Place as on the final example or with the pick tool K:
Position: X 0, Y 475
12/
Layers :

12/
Image, Add borders, symmetric:
1 px color 3
2 px color 2
2 px color 1
2 px color 2
13/
Duplicate this layer
Image, Resize a 60%, all layers unshecked
Activar a pick tool K, put the following data :

Mode: free
perspective X: - 23
Perspective Y: 3
Shear: - 4.00
Angle: 14.000
Image, Resize a 50% all layers unshecked
Image, mirror, mirror horizontal
Adjust, sharpness, sharpen
Effects, plugins: Alien Skin Eye Candy 5, Impact, Glass, setting: clear
place on the left or with the pick tool K :
Position : X 0, Y 344
14/
Carregar o tube Easter_Bunny7sw_Silvie_24.02.2021, copy/paste as a new layer
Image, resize a 50%, all layers unshecked
Effects 3 D drop shadow as before
Place it like on the final example
(mine: pick tool K : Position : X 214, Y 434)
Layers, duplicate
On the layer below
Adjust, blur, gaussien, radius at 10
Blend Mode, multiply
15/
Load the tube branches, copy/paste as a new layer, do not shift
16/
Load the tube paques-poussin-coly
Copy/paste as a new layer
Resize a 60 % all layers unshecked
Adjust, shapness, sharpen
place it with the pick tool K :
Position : X 30, Y 317
Apply the drop shadow as before (still memorized)
17/
Layers, merge visibles
18/
Add a new raster layer
Move down
Prepare a gradient Linear :

Fill with gradient
On the layer below (merged) :
Effects geommetric effects, perspective horizontal : a 30, transparent checked

Edit/ cut
(for security, you can paste as a new image)
Sélections, charger une sélection à partir du canal alpha, sélection 5
Edit/paste into selection (memorized image)
Remove the selection
Selections, select all, Float
Effects, Image effects, seamless tilling , setting: Default
Selections, invert
Edit/cut
On the layer raster 1
Paste as a new layer
Blur, gaussien blur, radius at 10
Ap lines SilverLining : GridPaper, new data:

Layers, propreties, Blend mode, multiply (or other, according to your colors)
Remove the selection
Merge down
19/
On the top of layers
Effects 3D drop shadow as before
20/
Image, Add borders, symmetric :
1 px color 3
2 px color 2
2 px color 1
2 px color 2
Select all
21/
Add borders: 50 px color 3
Effects , Image effects, semaless tilling, setting: Default
apply the drop shadow as before
Selection, invert
Blur, gaussien blur, radius at 10
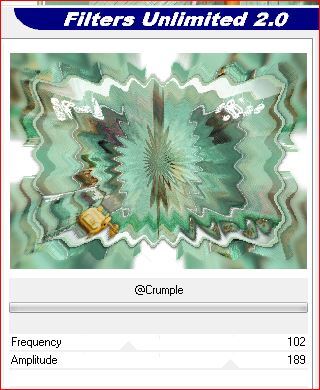
Effets, Unlimited, Bkg Designers sf10IV, @crumple (how to open):
Selections, Invert
Effects 3D drop shadow : 1/1/100/40 black
Remove the selection
Adjust, sharpness, sharpen (or according to your work)
22/
Load the main tube (woman in my case)
Copy/paste as a new layer
Image, Resize at 80% all layers unshecked
Adjust , sharpness, sharpen
put on the right how about the final example
Effets 3 D drop shadow, - 1/1/80/40 black
23/
Load the tube texte_titre
Copy/paste as a new layer
or write in a font of your choice, in the language of your choice
I used:

Place as in the final example or according to your work
or place with the pick tool K :
Position: X 582, Y 265
24/
Sign and attach my signature
Add borders, 1 px color 3
Resize width at 950 px
Save
Versão 2
Tube de Nicole, lapin de Animabelle, poussins de Krys, Merci!

Merci Alyciane pour avoir testé ce tuto:

Merci Béa pour avoir testé ce tuto
Merci Anja pour ses traductions NL et D

Inédits de ma conscience


