
-
Racines (GB)
Racines

This tutorial is my own, any similarity to another tutorial is just pure coincidence.
Forbidden to share without my permission.
Authorizations tubes
Material / credits
Plugins :
On Here
Thank you

Tube character:
License CDO, Not provided
Landscape : Silvie (groupe ), Not provided
Deco , WA: Moi-Même
Medhi wavy lab
Carolaine and sensibility
Alien skin Eye Candy 5 Impact
Azyzam’s
Flaming pear : Flexify 2
Facultatif: Xero
General preparation: Before starting one of my tutorials
This tutorial was created with PSP 2020, can be done with previous versions,
The alpha channel is compatible with pSP7
If you are unable to open canal_alpha: Place the selections in your PSP selections folder
Place the PSP scripts and gradients in the corresponding "regulated" folder.
Most of my filters are in Unlimited, check the filter folder, some work outside of it.
Open the mask on the PSP.
Duplicate the material and work on the copies.
Remove signatures from tubes before use
Make a double clck on presets
 , they will be installed automatically
 You can adapt the colors, the Blend mode of the layers, to your work
Initial dimension: 900x600 px

Colors :

1 #e5ba87
2 #37311e
3 #b48f4a
Put the colors :

Foreground, color 1
Background, color 2
1/
Open the alpha channel: Canal alpha racines
Effects plugins :
Mehdi Wavy Lab, in Mode: put color 3 in third position:

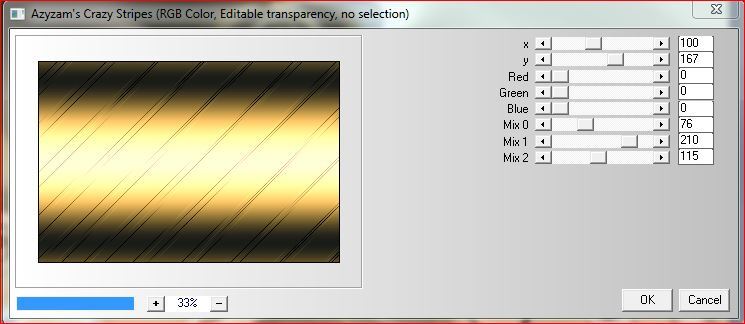
Effects, plugins: Azyzam’s Crazy Stripes :
2/
Layers, New raster layer
Selections, select all
Open the landscape tube
Copy/paste into selection
Adjust, Blur, radial, settings : Zoom centered

Effects, Image effects , seamless tilling, settings : side by side
Effects, Distortion effects, wave :

Effects plugins :
Flaming pear, Flexify 2: input and output data:

Selections, load a selection from alpha channel, Sélection 1
fill the selection with color 2
Selections, modify, contract de 4
fill with color 1
Selections, modify, contract de 4
Delete
Selections, select none ( remove the selection)
Image, Mirror, mirror horizontal
Image, Mirror, mirror vertical
Effects plugins:
Flamig Pear, Flexify 2, as before.
3/
Activate the bottom layer of the layers
Selections, load a selection from alpha channel, sélection 2
Promote selection to layer
Remove the selection
Effects plugins:
Flaming Pear, Flexify 2, as before
4/
Selections, load a selection from alpha channel, Sélection 3
Edit/Copy
About your work: Edit/Paste as a new layer
Layers, duplicate
Image, Flip, flip vertical
Layers, Merge down
5/
Open the character tube, Copy
About your work: paste as a new layer
Effects plugins :
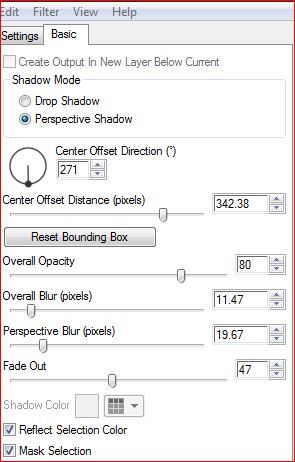
Alien Skin Eye Candy 5, Impact, perpective shadow
Apply the preset Racines
Data Basic here, if necessary :
6/
Activate the second layer, count down
Selections, load a selection from alpha channel, Sélection 3
Promote selection to layer
Effects plugins :
Carolaine and sensibility, CS_LDots : 255/3/2

7/
Layers, New raster layer
Selections, modify, select les borders of selection: Inside , width 2
Fill with color 2
Remove the selection
Layers, arrange, bring to top
Effects, 3 D effects, drop shadow, 0/0/100/15 , Black :

8/
Copy/past as a new layer, the déco nature tube
put as in my example, or adapt to your work
Selections, select all
Image, add borders, symmetric Checked
4 px color 1
2 px color 2
10 px color 1
2 px color 2
2 px color 3
2 px color 2
9/
Activar a magic wand, tolerance e feather a 0
Select the 10 px board
3D Effects drop shadow: 0/0/100/50, Black

10/
Sign your work
Add my signature (blend mode soft light, resize if necessary)
11/
Copy-paste the Wa titre, place as on my example or according to your work
Layers, Merge all
12/
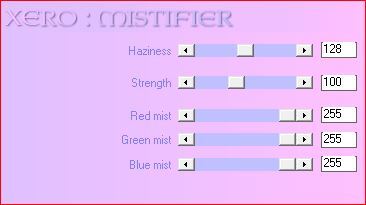
Optional: effects plugins, Xero, Mistifier:
13/
Image add borders, symmetric checked
2 px color 2
2 px color 3
2 px color 2
10 px color 1
14/
Image, Resize , width at 950 px
Save as JPG/jepg
-
Commentaires
Inédits de ma conscience
-

O crédito das imagens utilizadas
pertence ao devido Autor
Os meus tutoriais e traduções são protegidos por:
Interditos de qualquer difusão sem a minha autorização
Agradeço o respeito por o meu trabalho.

-


