-
Rentrée 2023 (eng)
Rentrée 2023
(Back to school 2023)
This tutorial is by Béa
Thank you Béa, for allowing me to translate your tutorial
This tutorial is protected by copyright
The material provided is protected by the authors of the tubes
It is prohibited to appropriate or modify the original and / or signatures.
Any dissemination without written authorization is prohibited.
Original Tutorial On Here
My version :
Main tube by Luz Cristina, Girl by Nikita , other unknowns and the material, Thank you!

Plugins:
Unlimited - Graphic Plus -
Carolaine and Sensibility - AAA Frames
Material On Here
Note: duplicate the material, work on the copies
if using the tubes of your choice, adjust their size and position.
1.
load the image "Fond"
Right-click on the layers palette - promote background layer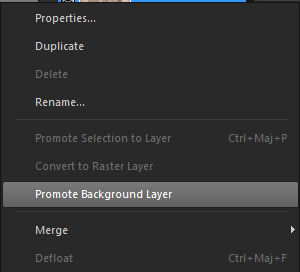
Layers, new raster layer
Choose a dark color over your main tube
Fill with chosen color
Layers, arrange, send to bottom
On the "Fond" layer, (layer above):layers, properties, Blend Mode, luminance (legacy) or as you like
2.
Load the "tableau" tube
Edit/copy
*on your work : paste as a new layer
With the pick tool "K", place it
Position X 268
Position Y 185
M Key to uncheck
Effects 3D, drop shadow 0 / 0 / 60 / 35 black
Adjust, sharpness, sharpen
Edit, repeat, sharpen3.
Load the "Etagère" tube
Edit/copy
* paste as a new layer
With the pick tool "K", place it
Position X 678
Position Y 366
(M)
Effects 3D, drop shadow , as before (memorized)
Adjust, sharpness, sharpen4.
Load the Meuble tube, copy
* paste as a new layer
Image - Mirror - Horizontal
With the pick tool "K", place it
Position X 8
Position Y 318
(M)
Effects 3D, drop shadow , as before
Adjust, sharpness, sharpen5.
Load the globe tube, copy*paste as a new layer
Place it on the piece of furniture from the previous step ( see original Here)
Effects 3D, drop shadow , as beforeAdjust, sharpness, sharpen
6.
Load the table d'écolier tube, copy*paste as a new layer
Image, Resize a 85% all layers unchecked
Image - Mirror - Horizontal
With the pick tool "K", place it
Position X 426
Position Y 415
(M)
Effects 3D, drop shadow , as beforeAdjust, sharpness, sharpen
7.
Load the texte tube, copy*paste as a new layer
do not move(Put it on the schoolboard if you are using another tube)
8.
Load the tube tâches*paste as a new layer
Colocar no topo, layers, properties, blend mode, soft light9.
Load the tube ardoise, copy*paste as a new layer
Coloque no cimo à direita
10.Load the tube enfant (3), copy
*paste as a new layer
Put how on the final example
Effects 3D, drop shadow , as before11.
Layers, merge visibles
Layers, Duplicate
Image Resize at 85% all layers unchecked12.
On the layer below: Adjust, Blur, radial blur: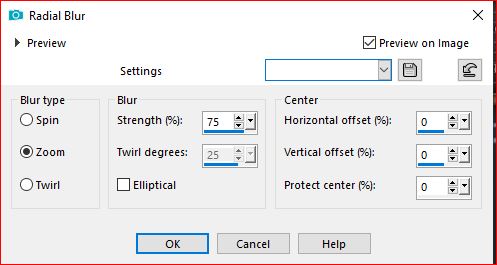
Effects, Edge effects, enhance more
Effects, plugins: Graphic Plus - Cross Shadow , how to opening
Adjust, sharpness, sharpen more
13.
Load the tube Deco, copy
* paste as a new layer
Blend Mode: soft light14.
On the top layerSelections, select all, float, defloat
Effects , plugins: Unlimited - Button & Frames - Mirrored Frame, at 18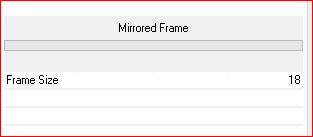
15.
Selections , modify, contract of 18
Effects 3D, drop shadow , as before
Select none
Effects 3D, drop shadow , as before16.
On the merged layer
Image, canvas size :
Effects 3D, drop shadow , as before
17.
On top layerLayers, new raster layer
Load the tube criança, by Lana, or yours
Remove signature, copy18.
*On your work: Selections, select all
Edit/paste into selection
Select none
19.Adjust, blur, radial, as before (memorized)
Effects, image effects. seamless tilling: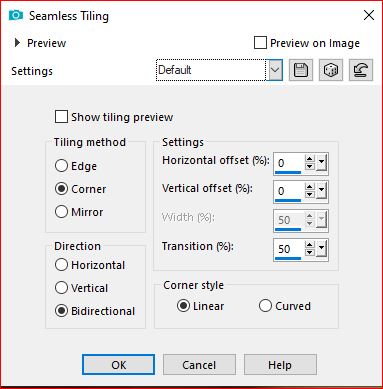
Effects , plugins: Carolaine and Sensibility - Cs-LDots, how to opening

Layers, arrange, send to bottom
20.
Layers, merge all21.
Edit/ paste as a new layer (child tube still memorized)
Resize a 90% , all layers unchecked
put how on the example22.
Duplicate this layer
On layer below, Adjust, Blur, gaussien, radius at 25
Blend Mode, Multiply23.
On the top layerLoad the tube livros (books), Copy
*paste as a new layer
put down left
Effects 3D, drop shadow , as before24.
Load the tube trombones (paper clip), copy
*paste as a new layer
With the pick tool "K", place it:
Position X 43
Position Y 25
( M)25.
On the background layer of layersLayers, new raster layer
Selections, Select all
Load the word art tube, copy
*paste into selection
Blend Mode, soft light (adapt to your work)
Layers, Duplicate26.
On the top layer
Effects, plugins: AAA Frames - Texture Frame: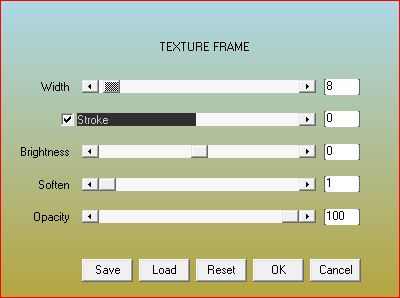
27.Sign and add the author's watermark
28.
Image, Add borders, symmetric de 1 px , dark color
Resize width at 950 px , all layers checked
Adjust, sharpness, unsharp mask, setting: softSave as jpeg
Inédits de ma conscience


