-
Rentrée 2024 (pt)
Este tutorial é da autoria
De : Alyciane

Site:
Obrigada Alyciane, por me autorizar a traduzir o seu tutorial em português
Este tutorial é protegido por copyright
O material fornecido é protegido pelos autores dos tubes
É proibido de se apropriar ou modificar o original e/ou as assinaturas.
É proibido qualquer difusão sem autorização escrita.
Tutorial original AQUI
Versão conforme ao original:

A minha versão: tubes du Kit Classroom Blues - AI Generated by https://aprilsshareables.blogspot.com

Material:
A descarregar no site da autora (clica sobre o papagaio)
Preparação: colocar a pattern (texture) na pasta patterns do seu PSP
Plugins:
CYBIA, Mezzy : Withen
Alien skin Eye candy 5, Impact : glass
VanDerLee, UnPlugged
Roteiro:
Cores:
Foreground, #2f4d05
Background, #708d17
cor 3: Branco
colocar as cores:

Carregar o ficheiro rentree 2024.pspimage , ele contém a seleções necessàrias
Selections, select all
Carregar a imagem fond
Edit/copy
*Sobre o seu trabalho: Edit/paste into selection
Selections, select none (remover a seleção)
Effects, image effects, seamless tilling: setting Default
Adjust, blur, radius a 25
Effects, plugins: Cybia, Mezzy, whiten 50/0

Selections, load a selection from alpha channel, Sélection 1

Selections, promote selection to layer
Effects, Texture effects, texture, lace:

Guardar a seleção ativa
Carregar o tube déco 1, copy
Sobre o seu trabalho: paste into selection
Effects, plugins: Alien Skin Eye Candy5, Impact 5, Glass, settings: Clear
Selections, modify , select the selection borders:

Preencher a seleção com a cor Foreground
Effects 3D, Inner bevel:

Remover a seleção (select none)
Sobre a layer raster 1
Sélection charger une selection à partir d'un canal alpha, Sélection 2
Selections, promote selection to layer
Effects, Texture effects, texture, lace: como antes, memorizado
Carregar déco 2, copy
*paste into selection
Effects, plugins: Alien Skin Eye Candy5, Impact 5, Glass, como antes, (memorisado Last Used )
Selections, modify , select the selection borders: como antes (memorizado)
Preencher com a cor Foreground
Effects 3D, Inner bevel, como antes (memorizado)
Remover a seleção
Sobre a layer raster 1
Sélection charger une selection à partir d'un canal alpha, Sélection 3
Promote selection to layer
Effects, Texture effects, texture, lace: como antes
Carregar déco 3, copy
*paste into selection
Effects, plugins: Alien Skin Eye Candy5, Impact 5, Glass, como antes
Selections, modify , select the selection borders: como antes
Preencher com a cor Foreground
Effects 3D, Inner bevel, como antes
Remover a seleção
Sobre a layer raster 1
Sélection charger une selection à partir d'un canal alpha, Sélection 4
Promote selection to layer
Effects, Texture effects, texture, lace: como antes
Carregar déco 4
*paste into selection
Effects, plugins: Alien Skin Eye Candy5, Impact 5, Glass, como antes
Selections, modify , select the selection borders: como antes
Preencher com a cor Foreground
Effects 3D, Inner bevel, como antes
Remover a seleção
Sélection charger une selection à partir d'un canal alpha, Sélection 5
Juntar uma nova layer
Carregar a imagem fond, copy
Paste into selection
Carregar o le tube personnage, copy
Paste as a new layer
Layers, duplicate
Adjust, blur, gaussien
Layers, properties, blend mod screen
Selections, modify, Select the selection borders, como ante
Preencher com a cor Foreground
Effect 3D, inner bevel , como antes
Remover a seleção
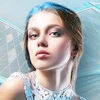
Resultado:

Carregar déco 5, copy
*paste as a new layer, com a move tool (M), colocar à esquerda (ver o exemplo final)

Effects, reflection effects, rotating mirror : 0/0/180 reflet

Sobre a layer raster 1 - Edit/copy
Layers, merge visibles
Image add borders, symmetric:
5 px Background
Selections, select all
Image add borders, symmetric:
40 px branco
Selections, invert
Edit/paste into selection (imagem memorizada)
Effects, plugins: VanDerLee UnPlugged- Defocus a 5

Adjust, sharpness, sharpen more
Image add borders, symmetric:
5 px background
Select all
Selections, modify, contract de 45
Effects 3D , drop shadow 0/0/40/80, preto

Remover a seleção
Carregar os dois tubes textes, colocar (ver exemplo final)
Assinar
Layers, Merge all (flatten)
Salve em JPG
Tradução por:

-
Commentaires
Inédits de ma conscience
-
O crédito das imagens utilizadas
pertence ao devido Autor
Os meus tutoriais e traduções são protegidos por:

Interditos de qualquer difusão sem a minha autorização
Agradeço o respeito por o meu trabalho.

-


Le monde de Béa


La passion de Mel

Le Jardin de Félinec31
Traduções Alyciane e Garances


Click sobre o nome
Cloclo

Barbara de Venise


En Français pour Anja Timmers


En Français pour SimPsp


-
Tubes divers:


-

-