
-
Par ©Moi-Même le 15 Août 2022 à 21:41
Automne 2022

This tutorial is by Béa

Thank you Béa, for allowing me to translate your tutorial
This tutorial is protected by copyright
The material provided is protected by the authors of the tubes
It is prohibited to appropriate or modify the original and / or signatures.
Any dissemination without written authorization is prohibited.
Original Tutorial On Here
Material: On here
You will need a character Tube
A minha Versão: original colors, additional decorations: by wieskes, corel tube leaf, character Tube by ZZT/licence

Plugins:
Alien skin eye Candy 5 Impact
Unlimited
Tramages
Mura's Meister
Graphic Plus
Choose colors:
Color 1 and color 2: on the landscape
Color 3: On character tube
original colors: (palette provided in the material)

1.
Load the file alpha_automne2022
Window/duplicate
close the original, let's work on the copy
2.
Load the landscape tube ( SoniaTubes_0067_22)
(keep it open on your PSP for later)
Edit/copy
* On your work:
Selections, Select all
Edit/paste into selection
Selections, select none
3.
Effects, Image effects, seamless tilling, setting: Default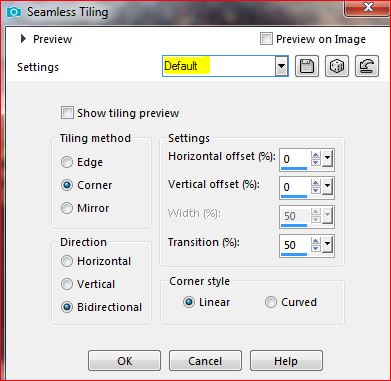
Adjust, Blur, radial:

Effects, edge effects, enhance more
Layers, merge all
Position yourself on the materials palette:
right click, promote background layer (= Raster 1)
4.
Layers, duplicateImage , Mirror, horizontal
Image , Mirror, vertical
Load the mask NarahsMasks_1729Layers, new mask layer, from image:

Layers, merge group
We hardly see anything, it's normalNote- Activate Raster 1, add a new layer, fill it with black (delete this layer when finished)
Activate the top layer of layers
5.
Selections, Load a selection from alpha channel
Load sélection 1

Selections, promote selection to layer
Copy the initial landscape again
* Edit/paste as a new layer
Image, Resize a 65% all layers unshecked (adapt to your tube)
6.Activate the Move tool: put it inside selection
Selections/Invert
DELETE
Selections/ Invert
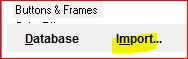
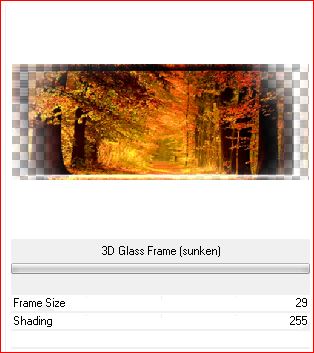
Layers, merge downEffects , plugins: Unlimited , Buttons & Frames , 3D Glass Frame (sunken)
(provided in the material: put in the Unlimited file or import)
Effects 3D drop shadow 0 / 0 / 75 / 25 black

Select none
7.
Activate the layer below (Group - Copy of Raster 1)Selections, Load a selection from alpha channel
Load sélection 2
Selections, promote selection to layer
Layers, arrange, bring to top
Keep selected
8.
Copy the initial landscape again* Edit/paste as a new layer
Resize a 85% all layers unshecked (adapt)
put it inside selection (the part of it you want to keep)
Selections/Invert
DELETE
Selections/Invert
Layers, merge down
Effects, plugins: Unlimited, Buttons & Frames , Gradient Frame:

Click on the gradient next to Apply, choose a gradient that is in harmony with your colors
like the author, I chose gradient 11
Effects 3D drop shadow as beforeSelect none
9.
On the Raster 1 layerSelections, Load a selection from alpha channel
Load sélection 3
Selections , promote selection to layer
Layers, arrange, bring to top
Effects, plugins: Alien skin eye Candy 5 Impact , Glass, setting: clear no drop shadow

Effects 3D , drop shadow as before
10.
On the Raster 1 layerSelections, Load a selection from alpha channel
Load sélection 4
(this selection cancels the previous one)
Selections, promote selection to layer
Layers, arrange, bring to top
Effects, plugins: Alien Skin eye Candy 5 Impact, Glass, setting: clear
Effects 3D drop shadow as before
select none
11.
On the mask layer: Group - Copy of Raster 1Effects 3 D drop shadow cas before
Stay on this layer
12.
Selections, Load a selection from alpha channel
Load sélection 5
Selections , promote selection to layer
Effects 3D drop shadow as before
Adjust, sharpness, sharpen moreSelect none
Effects, Image effects, seamless tilling:
don't forget to delete the black layer (Raster 2 if you used the author's tip)
13.
On the Raster 1 layerColor 1 : Foreground (#a25f2b) or a light color of your choice
Effects, plugins: Unlimited , Tramages, Tow the line...:

Layers/duplicate
Color 2 : Background
Effects, plugins: Mura's Meister , Perspective tiling:

Activate the Magic tool - Feather at 25 - Click on transparent part of the layer

DELETE 4 times
Magic tool: Set feather to 0
Remover a seleção
Effetcs 3D drop shadow as before
14.
On the Raster 1 layerLayers, new raster layer
Fill in white
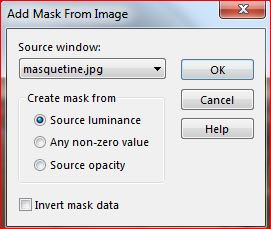
Load the mask: masquetine
Layers, new mask layer from image
Duplicate
Layers, merge group
Layers, propreties, Blend Mode Dodge, opacity at 60

On top layer of layers
Layers, merge down 3 times
ou
(Go to the top layer of the stack for easier close the eye of the bottom 5 layers
Merge visibles, Reopen the closed layers)
Atctivate the pick tool " K key" , place it:Position X 110
Position Y 115
M Key to deselect15.
current layers:
16.
We are on the top of layers
Load your character tube, copy
* Paste as a new layer
Resize if necessary
place it as you wish
Duplicate
On the layer below: adjust, Blur, gaussien , radius at 30
Blend Mode Multiply
17.
put the colors:
Foreground Color 3
Background Color 2
Activate the top layer of layers
Load the tube" texte", copy
* Paste as a new layer
Activate the pick tool "K", place it:
Position X 220
Position Y 8
(M)
Selections, Select all, float, defloat
Fill with color 2 (dark color)
Selections, Modify, Contract at 2
Fill with color 3 (or chosen)
Select none
18.
Load the tube lignes titreCopy/*paste as a new layer
Activate the pick tool "K" , place it:
Position X 192
Position Y 40
( M )
(I did: arrange, move down)
19.
On the Raster 1 layerLoad the tube Decoligne ( pspimage file)
Edit/Copy
* Paste as a new layer
Colorize if necessary
(you can modify opacity and blend mode if needed)
20.
Image, Add borders, (symmetric):1 px color 3
2 px color 2
1 px color 3
10 px white2 px color 3
5 px white
with the magic tool (tolerance and feather at 0), Select the white border of 5 px
Color 3/ Foreground - Color 2 /Background
prepare and fill with the following linear gradient:

Select none
21.
Image, Add borders ( symmetric):10 px white
2 px color 2
Selections , select allImage, add borders : 30 px white
Selections/Invert
Fill with the same gradient
(You can also choose your colors)
Effects, plugins:
Graphic Plus, Cross Shadow, how to opening
Unlimited , Tramages, Tow the lines , as before (80/255/255/80)
Adjust, sharpness, sharpen
Selections/Invert
Effects 3D drop shadow as before
Edit/repat drop shadow
Select none22.
You can add a leaf in the upper right corner (I attached it to the left)
drop shadow as your choice
Adjust, sharpness/sharpen
Facultatif : Add an Autumn decoration (I did it )
23.
Sign and add the author's watermark23.
Image, add borders: 1 px dark colorResize width at 950 px , all layers checked
Adjust, sharpness, unsharp mask, Setting: soft
Save as jpeg

 votre commentaire
 Suivre le flux RSS des articles de cette rubrique Suivre le flux RSS des commentaires de cette rubrique
Inédits de ma conscience
-
O crédito das imagens utilizadas
pertence ao devido Autor
Os meus tutoriais e traduções são protegidos por:

Interditos de qualquer difusão sem a minha autorização
Agradeço o respeito por o meu trabalho.

-


