-
Bonne Année 2024 (eng)
Bonne Année 2024
Happy New Year 2024
This tutorial is by Béa
Thank you Béa, for allowing me to translate your tutorial
This tutorial is protected by copyright
The material provided is protected by the authors of the tubes
It is prohibited to appropriate or modify the original and / or signatures.
Any dissemination without written authorization is prohibited.
Original Tutorial On Here
Version conforming to the original: no animated

Material On Here
Plugins:
Ap01 (Innovations) - Lines - Silverlining
Graphic plus (imported on Filters Unlimited if this is your case)
Roteiro:
1.
Load the file Alpha_BonneAnnee2024
Window - Duplicate
Close the original and continue with the copy2.
Load the tube Misted_05_Lemondedebea
(Remove signature from tubes before using them)
Edit/Copy
*On your work: Selections, Select all
Edit/paste into selection
Selections , select none3.
Effects, Image effects, seamless tilling, settings: default
Adjust, blur, radial blur:
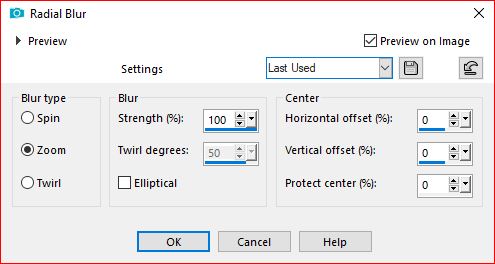
Effects, Edge effects, enhance more
Layers, merge all4.
Right click on the layers palette, promote background layer :
5.
Load the mask sg_queen-of-hearts.png, copy
*Layers, new raster layer
Selections, select all
Edit/paste into selection
Selections, select none
Layers, properties, Blend mode, screen6.
Selections, load a selection from alpha channel, sélection 1
On the layer below
Layers, new raster layer
On the misted, copy
*on your work: Paste into selection
Select none7.
On the Raster 1 layer
Selections, load a selection from alpha channel, sélection 2
Selections/Invert
Selections, promote selection to layer
Adjust, blur, gaussien, radius at 25
Effects, plugins: Ap01 (Innovations) - Lines - Silverlining:
8.
Layers, new raster layer
Effects 3D , cutout: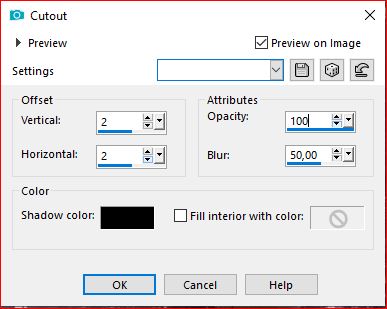
Select none
9.
Current layers:
10.
Activate the mask layer
Selections, load a selection from alpha channel, sélection 3
Effects , edge effects, enhance
Select none11.
Lad the Deco_cadre, copy
* paste as a new layer12.
Load the tube mulher, copy
* paste as a new layer
Image, resize at 85%, all layers unchecked
Put as over the final example13.
Layers/ Duplicate
On the layer below (original)
Adjust, blur, gaussien, radius at 25
Layers, properties, blend mode, Multiply14.
Image, Add borders, symmetric: 1 px white
Edit/ Copy
Select all
Image, Add borders, symmetric: 5 px any color
Selections/ Invert
Edit/paste into selection (memorized image)
Effects , plugins: Graphic Plus - Cross Shadow, how to open
Select none15.
Image, Add borders, symmetric: 1 px white
Select all
Image, Add borders, symmetric: 10 px white
Effects 3D, drop shadow 0 / 0 / 100 / 100 , black
Select none16.
Image, Add borders, symmetric: 1 px white
Select all
Image, Add borders, symmetric: 25 px white
Selections/Invert
Edit/paste into selection (image still memorized)
Effects, reflection effects, Kaleidoscope, Settings: Default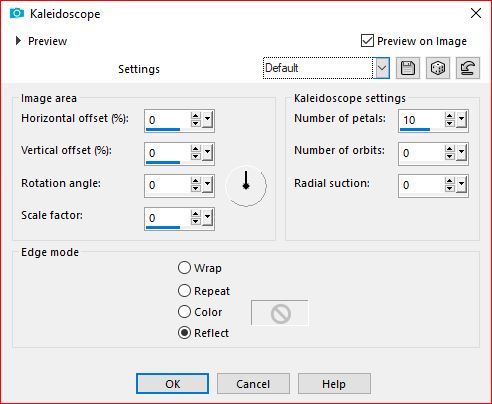
Adjust, sharpness, sharpen
17.
Selections/ Invert
Effects 3D drop shadow, as before
Select none18.
Load the tube coupes de champagne, copyPaste as a new layer
Put as on the final example (right bottom corner)19.
Sign and add the author's watermark20.
Image, Add borders, symmetric: 1 px whiteIf you do not want to proceed with the animation, save it in jpeg
21.
For GIF Animation:My software is in French, follow the author's method, in point 21, on her website
Translated by:
Inédits de ma conscience


