-
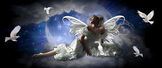
Éclaire moi la nuit (GB)
Éclaire moi la nuit

This tutorial is by Mel
Thank you Mel, for allowing me to translate it into Portuguese
This tutorial is protected by copyright

Please read:
The material provided is protected by the authors of the original tubes or artists.
The tubes are found on the net or with their own authorization.
It is prohibited to appropriate or modify the original and / or signatures.
If a tube / image belongs to you, please contact the creator.
Any broadcast without written permission is prohibited.
Original Tutorial : On Here
My version: Tube de Glamour tubes, misted de Moi-Même

Plugins:
Unlimited
Carolaine and Sensibility
Alien Skin Eye Candy 5 : Impact
Mura's Meister
Material: On Here
You will need a character tube
Original colors:

My colors:
1/ #70799c 2/ #1f2346 3/#fdfdd6 4 / #ffffff

put colors:
Color 1 /Foreground
Color 2 /Background
1.
Load the : Canal-Alpha_Eclaire-moi
Duplicate
close the original
We will work on the copy
2.
Prepare a Gradient : rectangular:

Fill with the gradient
Layers, Duplicate
Effects, Image effects,seamless tilling: Setting Default

Effects, plugins, apply the plugin: Unlimited , Bkg Kaleidoscope, Quad Flip, how to open:

3.
Selections, load a selection from alpha channel
Load the sélection 1
Promote selection to layer
Selections, select none
Apply the plugin: Unlimited , Bkg Designers sf10 I , Corner Half Wrap
Apply the plugin: Carolaine and Sensibility , CS Ldots , how to open

Edit, Repeat Cs-Ldots
Effects, 3D, drop shadow 0/0/75/25 black
4.
Activate the Copy of raster 1
Selections, load a selection from alpha channel
load the selection 1
Promote selection to layer
Duplicate
On materials, click on the eye next to the layer, to make it invisible

Keep selected
5.
On the layer below ( promoted selection 1 )
Apply the plugin: Unlimited, Bkg Designers sf10 IV , @the twist, how to open

Layers, propreties, Blend mode, multiply
(if you have a white background, change the blend mode to suit your work)
On the layer above
Clica sobre o olho par tornar a layer visivèl
Keep selected
Apply the plugin: Unlimited , Bkg Designers sf10 I , Corner Half Wrap
Image , Resize a 50% all layers unshecked
Select none
Effects 3D , drop shadow: 0/0/75/25 Black
6.
On the layer below ( promoted selection 1)
Duplicate
Layers, arrange, Move up
Image, Resize a 25% all layers unshecked
Apply the plugin: Alien Skin Eye Candy 5, Impact : Glass, Setting clear
Blend mode: adapt to your work, I left it in normal mode
7.
Activate the top layer of the layers
Layers, new raster layer
Selections, load a selection from alpha channel
Load the selection 2
fill with color 2
Duplicate
select none
Apply the plugin: Unlimited , Bkg Designers sf10 I , Cruncher at 25/25
Layers, merge down
Layers, Move down
8.
Layers, new raster layer
Selections, load a selection from alpha channel
load the sélection 3
Fill with color 3
select none
Apply the plugin: Mura's Meister , Copies :

Aplicar o plugin: Alien Skin Eye Candy 5 , Impact : Glass , Setting clear
Effects 3D , drop shadow: 0/0/30/25 white
Layers, Merge Down
Duplicate
Image, Mirror, Mirror Horizontal
9.
Selections, load a selection from alpha channel
Load the sélection 4
Open the o misted landscape
Edit/Copy/paste as a new layer
Image , Resize a 130% all layers unshecked
Adjust the tube at the top (move tool M)
Selections, Invert
DELETE
Select none
10.
Layers, propreties, Blend Mode Luminance (legacy)
(I put this layer in blend mode Overlay)
Duplicate
Layers, Move down
Adjust, Blur , Motion blur

(I put this layer in Blending mode screen)
11.
Edit/Copy/paste as a new layer, the WordArt
put to your liking
Layers, arrange, Bring to top
12.
Layers, new raster layer
Fill in white
Load the mask
Layers, New mask layer, from image

Layers, Merge group
Blend Mode : soft light
Pick tool K (K key to activate) : Put
X (-2) , Y (168)

(M key to disable)
13.
Edit/Copy your character tube
Edit, paste as a new layer
Adapt the size of the tube if necessary
Place it to the left or depending on your work
Apply the plugin: Alien Skin Eye Candy 5, Impact: Perseptive Shadow , Setting Drop Shadow Blurry
14.
Image, Add borders, symmetric:
3 px color 2
3 px color 1
3 px color 3
(I inverted color 3 and 1)
10 px white
3 px color 2
3 px color 1
3 px color 3
15.
Selections, Select all
Image, Add borders
30 px white
Selections, Invert
Effects, Reflection effects, Kaleidoscope:

Apply the plugin: Carolaine and Sensibility - CS Ldots (how to open)
Edit, Repeat Cs Ldots
Selections, Invert
Effects 3D , drop shadow 0/0/80/40 black
Select none
16.
Load the tube Déco
Edit/copy/ Paste as a new layer
Selections, select all, float, defloat
Fille with color 3
Apply the plugin: Alien Skin Eye Candy 5 , Impact: Glass , Setting Clear
Select none
17.
Sign your work
Add the author Watermark
Image/Add borders:
3 px color 3
3 px color 1
3 px color 2
18.
Image, Resize width at 950 px
Adjust, Sharpness, Unsharp mask, seeting: soft

Save as JPEG
Inédits de ma conscience
-

O crédito das imagens utilizadas
pertence ao devido Autor
Os meus tutoriais e traduções são protegidos por:

Interditos de qualquer difusão sem a minha autorização
Agradeço o respeito por o meu trabalho.

-


Le monde de Béa


La passion de Mel

Le Jardin de Félinec31
Traduções Alyciane e Garances


Click sobre o nome
Cloclo
Barbara de Venise


En Français pour Anja Timmers


En Français pour SimPsp


-
Tubes divers:


-

-