-
Eclaire moi la nuit(pt)
Éclaire moi la nuit

Este tutorial é da autoria de Mel
Obrigada Mel, por me autorizar a traduzir-lo em português
Este tutorial é protegido por copyright

Por favor , ler:
O material fornecido é protegido pelos autores dos tubes ou artistas originais
Os tubes são encontrados na net ou com autorização dos próprios
É proibido de se apropriar ou modificar o original e/ou as assinaturas.
Se um tube/imagem lhe pertence, por favor, tome contacto com a criadora
É proibido qualquer difusão sem autorização escrita.
Tutorial original : Aqui
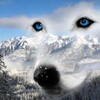
A minha versão: Tube de Glamour tubes, misted de Moi-Même

Plugins:
Unlimited
Carolaine and Sensibility
Alien Skin Eye Candy 5 : Impact
Mura's Meister
Material: Aqui
Vai precisar de um tube personagem
Cores originais:

As minhas cores:
1/ #70799c 2/ #1f2346 3/#fdfdd6 4 / #ffffff

colocar as cores:
Cor 1 Foreground
Cor 2 Background
1.
Carregar o : Canal-Alpha_Eclaire-moi
Duplicar
Fechar o original
Trabalharemos sobre a copia
2.
Préparar um gradient : rectangular:

Preencher com o gradient
Duplicar esta layer
Effects, Image effects,seamless tilling: Setting Default

Effects, plugins, aplicar o plugin: Unlimited , Bkg Kaleidoscope, Quad Flip, como à abertura:

3.
Selections, load a selection from alpha channel
Carregar a sélection 1
Promote selection to layer
Remover a seleção
aplicar o plugin: Unlimited , Bkg Designers sf10 I , Corner Half Wrap
aplicar o plugin: Carolaine and Sensibility , CS Ldots como à abertura

Edit, Repeat Cs-Ldots
Effects, 3D, drop shadow 0/0/75/25 preto
4.
Sobre a Copy of raster 1
Selections, load a selection from alpha channel
Carregar a sélection 1
Promote selection to layer
Duplicar esta layer
Na paleta materials, clique sobre o olho para a tornar invisivèl

Deixar seleccionado
5.
Sobre a layer abaixo ( promoted selection 1 )
aplicar o plugin: Unlimited, Bkg Designers sf10 IV , @the twist, como à abertura

Layers, propreties, Blend mode, multiply
(no caso de ter um fundo branco, mude o blend mode para adaptar ao seu trabalho)
Sobre a layer acima
Clica sobre o olho par tornar a layer visivèl
Guardar seleccinado
aplicar o plugin: Unlimited , Bkg Designers sf10 I , Corner Half Wrap
Image , Resize a 50% all layers desmarcado
Remover a seleção
Effects 3D , drop shadow: 0/0/75/25 preto
6.
Sobre a layer abaixo ( promoted selection 1)
Duplicar esta layer
Layers, arrange, Move up
Image, Resize a 25% all layers desmarcado
aplicar o plugin: Alien Skin Eye Candy 5, Impact : Glass, Setting clear
Blend mode: adaptar ao seu trabalho, eu deixei em mode normal
7.
Activar a layer do topo das layers
Juntar uma nova layer
Selections, load a selection from alpha channel
Carregar a sélection 2
preencher com a cor 2
Duplicar esta layer
Remover a seleção
aplicar o plugin: Unlimited , Bkg Designers sf10 I , Cruncher a 25/25
Layers, merge down
Layers, Move down
8.
Juntar uma nova layer
Selections, load a selection from alpha channel
Carregar a sélection 3
Preencher com a cor 3
Remover a seleção
aplicar o plugin: Mura's Meister , Copies :

aplicar o plugin: Alien Skin Eye Candy 5 , Impact : Glass , Setting clear
Effects 3D , drop shadow: 0/0/30/25 branco
Layers, Merge Down
Duplicar esta layer
Image, Mirror, Mirror Horizontal
9.
Selections, load a selection from alpha channel
Carregar a sélection 4
carregar o misted paisagem
Edit/Copy/paste as a new layer
Image , Resize a 130% all layers desmarcado
Ajustar o tube no cimo ( move tool M)
Selections, Invert
DELETE
Remover a seleção
10.
Layers, propreties, Blend Mode Luminance (legacy)
(eu pus esta layer em blend mode Overlay)
Duplicar esta layer
Layers, Move down
Adjust, Blur , Motion blur

(eu pus esta layer em Blend mode screnn)
11.
Edit/Copy/paste as a new layer, o WordArt
colocar a seu gosto
Layers, arrange, Bring to top
12.
Juntar uma nova layer
Preencher de branco
carregar o mask
Layers, New mask layer, from image

Layers, Merge group
Blend Mode : soft light
Pick tool K (tecla K para activar) : colocar
X (-2) , Y (168)

(Tecla M para desactivar)
13.
Edit/Copy o seu tube personagem
Edit, paste as a new layer
Adaptar a d dimensão du tube se necessàrio
Colocar à esquerda ou consoante o seu trabalho
aplicar o plugin: Alien Skin Eye Candy 5, Impact: Perseptive Shadow , Setting Drop Shadow Blurry
14.
Image, Add borders, symmetric:
3 px cor 2
3 px cor 1
3 px cor 3
(eu inverti a cor 3 e 1 )
10 px de branco
3 px cor 2
3 px cor 1
3 px cor 3
15.
Selections, Select all
Image, Add borders
30 px de branco
Selections, Invert
Effects, Reflection effects, Kaleidoscope:

aplicar o plugin: Carolaine and Sensibility - CS Ldots (par défaut)
Edit, Repeat Cs Ldots
Selections, Invert
Effects 3D , drop shadow 0/0/80/40 preto
Remover a seleção
16.
Carregar o tube Déco
Edit/copy/ Paste as a new layer
Selections, select all, float, defloat
Preencher com a cor 3
aplicar o plugin: Alien Skin Eye Candy 5 , Impact: Glass , Setting Clear
Remover a seleção
17.
Assine o seu trabalho
Junte o Watermark da autora
Image/Add borders:
3 px cor 3
3 px cor 1
3 px cor 2
18.
Image, Resize width a 950 px
Adjust, Sharpness, Unsharp mask, seeting: soft

Salve em JPEG
Inédits de ma conscience
-

O crédito das imagens utilizadas
pertence ao devido Autor
Os meus tutoriais e traduções são protegidos por:

Interditos de qualquer difusão sem a minha autorização
Agradeço o respeito por o meu trabalho.

-


Le monde de Béa


La passion de Mel

Le Jardin de Félinec31
Traduções Alyciane e Garances


Click sobre o nome
Cloclo

Barbara de Venise


En Français pour Anja Timmers


En Français pour SimPsp


-
Tubes divers:


-

-