
-
Par ©Moi-Même le 23 Décembre 2020 à 20:24
Bonne Année 2021
Happy 2021


animation gif:

This tutorial is my creation, any resemblance to any other tutorial is pure coincidence.
Prohibited from sharing without my permission.
Autorisations
Tubes, masks, backround, décos ,WA
Plugins :

On Here
Credit for the images used belongs to the author
My tutorials are protected by:

Tubes:
Tube by: Azalée
Thank you tubeurs!
WA , tubes décos : by Moi-Même
others to do during the tutorial
MuRa’s Meister
Alien skin Eye Candy 5, Impact
------
Optional animation :
Animation shop
Alien Skin Xenofex 2
General preparation: Before starting one of my tutorials
This tutorial was created with PSP 2020, can be done with previous versions,
The alpha channel is compatible with pSP7
If you can't open alpha channel: Place the selections in your PSP selections folder
Place the PSP scripts and gradients in the corresponding "regulated" folder.
Most of my filters are in Unlimited, check the filter folder, some work outside of it.
Open the mask on the PSP.
Duplicate the material and work on the copies.
Remove signatures from tubes before use
Double click on presets
 , they will be installed automatically
 You can adapt the colors, the Blend mode of the layers, to your work

Material:

Initial dimensions900x600 px
Colors:

Foreground Color 1 : #27242b
background Color 2 : #605d5f
Color 3 : #f7c9b5
In Materials, put the colors :

1/
Load the alpha Bonne Année 2021
fill with color 2
2/
Layers, New raster layer
Effects plugins:
(if necessary: my effect layer chrome, is on the material)
Alien skin Eye Candy 5, Impact, Chrome : apply the preset Bonne Année 2021 (user settings)
Data like this if necessary:
Reflection Map: Nature palm Trees
Basic :

Layers, propreties, blend mode, luminance (lagacy)
Layers, merge down
3/
Selections, load a selection from alpha channel, sélection 1
Selections, promote selection to layer
Adjust,Blur, gaussien, radius at 40
Effects ,Textures, Tiles, (tille shape, Square ):

4/
Add a new raster layer
Fill with the color 1
selections, select none
Selections, load a selection from alpha channel, Sélection 2
Delete
Select none
Effects 3 D, Inner bevel ( n°2) :

5/
load the tube : Cadran_montre3_tube_byMM
( to adapt it to your colors utilise the changer color tool )
Edit, Copy
On your work : Edit, paste as a new layer
Image, Resize a 80% all layers unshecked
place with the pick tool K (K key to activate it):
Position : X 94, Y 145
(M key to deselect the tool)
Effects 3 D drop shadow : 1/1/100/1 black
6/
Layers, merge down
Effects 3 D drop shadow : 1/1/100/16 black
Merge down
Effects plugins :
Alien Skin, Eye Candy 5 Impact, Perpective Shadow, apply the preset B année 2021
Data like this if necessary, Setting: reflect in front
Basic:

Objects, Align, bottom (to slip down slightly)
Effects 3D, drop shadow as before
7/
Layers, new raster layer
Fill with color 3
8/
Load the mask : projecteurs mask
Layers, new mask layer, from image :

layers, Merge group
Change for: Blend Mode , screen, Opacity a 80
9/
On the layer raster 1
Selections, load a sélection from alpha channel, Sélection 3
Promote selection to layer
Adjust, blur, gaussien, as before
Effects, Textures, tiles, as before
Colocar: Blend Mode, Dissolve, opacity at 80

Select none
10/
On the layer raster 1
Selections, load a sélection from alpha channel, Sélection 4
Promote selection to layer
Arrange, move up
Select none
(you can't see anything and it's normal)
11/
Effects 3D, Inner Bevel, as before
Effects 3D drop shadow, as before
Edit, réepeat drop shadow
Adjust, sharpness, sharpen more
12/
On the layer above ( promoted Selection 1)
Load the tube: feux-de-nouvel-an-MM
Copy/paste as a new layer
put bottom left :
Objects, Align, left and align bottom
Change: Blend Mode mélange, hard light, opacity at 80
(adapt to your decor and work)
13/
On the layer raster 1
Layers, Duplicate
Effects textures, Tiles as before
Effects, plugins : MuRa’s Meister, Perspective tilling :

Selections, load a sélection from alpha channel, Sélection 5
Delete 4 times
Select none
14/
On the top of layers
Load the title : Wa BA2021, copy/paste as a new layer
Place it with the pick tool K:
Position : X 118, Y 27
Effects 3 D, Drop shadow, 1/1/100/1 black
15/
On the layer raster 1
Edit, Copy
16/
Image, add borders, symmetric :
1 px color 1
2 px color 2
1 px color 1
5 px color 3
1 px color 1
17/
Selections, select all
18/
Image add borders, symmetric :
20 px color 2
Selections, Invert
Edit/paste into selection (The image was saved)
Remover a seleção
19/
Image , add borders , symmetric :
1 px color 1
2 px color 2
20/
Activat the magic wand tool, tolerance and feather at zero, select the border of 5 px cor 3
Effects Textures,Tiles, as before (still memorised )
Effects 3 D, Inner bevel, como antes (still memorised )
Select none
21/
Load the Main Tube (woman in my case)
Image, Resize a 80% all layers unshecked
(or adapt to your tube)
Adjust, Sharpness, Sharpen
Place with pick tool K:
Position : X 629, Y 55 (adapt to your tube)
(M to deselect the tool )
Effects plugins :
Alien Skin Eye Candy 5, Impact, Perspective shadow, drop shadow blurry
22/
Sign and attach my signature
23/
Add borders, 1 px color 1
Sharpness, sharpen (if it is necessary)
24/
Copy/paste o tube: déco tchin-tchin
place with the pick tool K :
Position : X 166, Y 370
(M to deselect the tool )
Effects, plugins :
Alien Skin Eye Candy 5, Impact, Perspective shadow, drop shadow blurry
25/
Animation is not mandatory
If you wish to proceed with the animation, ignore this point, continue at step 26
Image, Resize width at 950 px all layers marcado
Save

26/
For Animation gif :
(if you use another decoration, or if this stage is problematic, see another option at the bottom of the page)
Skip the step 25
You need Animation shop
The animation will have 3 images
Note:
my PNG layers, effects of the constellation xenofex plugins, are in the animation folder
copy and paste each of them, as a new layer, adjust the position, if necessary, close and open as shown.
We started :
1/
Still on your PSP work
Duplicate the decoration 2 times
So, you get 3 decorative images, rename them 1, 2, 3
Image, Resize width at 950 px all layers checked
2/
Selections, load a selection from alpha channel, Sélection 6
(You can increase it by 1px if desired or select multiple points with the magic tool, On a dark color)
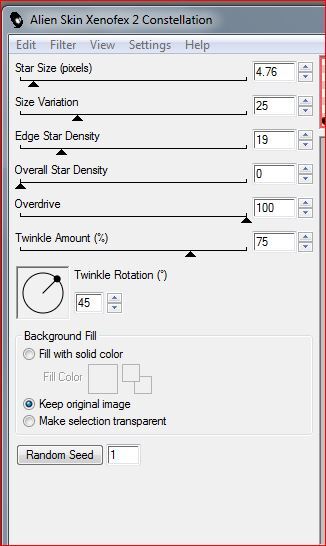
Effects , plugins : Alien Skin Xenofex 2 , Constellation :
On settings choose: bling bling
parameters : Star Size (pixels) à 4.76:
Close the layer (In materials, click on the eye to make it invisible)
3/
On the layer below
Redo the contellation effect, with the same parameters, but click 1x on random seed
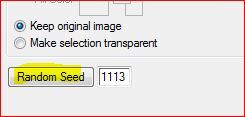
Close the layer, as explained above
4/
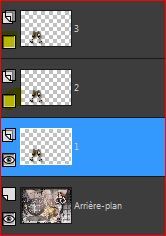
Repeat the same process for the layer below, (random seed), close the layer
the layers screenshot:
Select none
5/
Edit, copy special, copy merged
6/
On Animation shop
Edit, past as a new animation
7/
On psp
close the layer 1
Place yourself and open the layer 2 :

Edit, copy spécial, copy merged
8/
On Animation Shop
Edit, past after courrent image
9/
On PSP
Repeat the same procedures for the layer 3
10/
On Animation shop
(click to see the animation

click again to stop it)
Animation, Image propreties :

File, save as gif
My version 2: tube by Maryse, thank you !
If you use another decoration, this is the case for my second version (above):
Do not duplicate the decoration
With the magic wand tool, previous settings
make several clicks on your decor and on a dark color
Note: Save the selection to the alpha channel or disk, so that you can recover it if you lose it
Effetcts plugins: Xenofex as before
Select none
Edit, copy spécial, copy merged
Animation Shop : paste as a new animation
On your work PSP, undo 2x, the selection reappears
Effects plugins: Xenofex>>> click on random seed 1 time
repeat the steps again, 2 times
Save as gif

Thank you Alyciane for testing this tutorial:
Thank you Béa for testing this tutorial:

Send me Your work, he will be published after the original tutorial ( On Here)
Thank you Marika
 3 commentaires
 Suivre le flux RSS des articles de cette rubrique Suivre le flux RSS des commentaires de cette rubrique
Inédits de ma conscience
-
O crédito das imagens utilizadas
pertence ao devido Autor
Os meus tutoriais e traduções são protegidos por:
Interditos de qualquer difusão sem a minha autorização
Agradeço o respeito por o meu trabalho.

-


