-
Par ©Moi-Même le 24 Avril 2020 à 16:14
S comme Sim
(sim = Yes)
Dedication to group Sim

This tutorial is my own, any resemblance to another tutorial is just pure coincidence.
Forbidden to share without my permission.
Autorizations
Tubes, masks, backgrounds, decorations ,WA
Plugins:
On Here
the credits of the images used,
belong to the appropriate authors
My tutorials are protected:

Thank you tubers
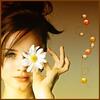
Tube de Nara

Decorations , WA: from me
others to be done during the tutorial
Unlimited :
Bkg designer sf10I
.....
AAA Frames
Mehdi
Carolaine and sensibility
General preparation: Before starting one of my tutorials
This tutorial was created with PSP 2020, can be done with previous versions,
The alpha channel is compatible with pSP7
If you can't open alpha channel: Place the selections in your PSP selections folder
Place the PSP scripts and gradients in the corresponding "regulated" folder.
Most of my filters are in Unlimited, check the filter folder, some work outside of it.
Open the mask on the PSP.
Duplicate the material and work on the copies.
Remove signatures from tubes before use
Double click on presets
 , they will be installed automatically
 You can adapt the colors, the Blend mode of the layers, to your work
Material:

Initial dimensions: 900x600 px
Colors :

Foreground/ color 1: #d52d85
Background/ Color 2: #2a2e2a
Color 3: #e3d8dd
Color 4: #bf696b
1/
Load the canal alpha_Sim
Effects, plugins:
Mehdi Wavy Lab 1.1 : In Mode, put color 3 in the 3rd box, color 4 in the 4th box:

Adjust, Blur, gaussien, radius at 25
2/
Apply the plugin: Mehdi, Sorting tiles :

Apply the plugin: Mehdi, Edges FX : In Effects, colorize, put the color 3:

Apply the plugin : Mehdi Kaleidoscope 2.1 :

3/
Selections, load a selection from alpha channel, Sélection 1
Selections, promote selection to layer
Apply the plugin: Carolaine and sensibility : CS_Halloween 2: how to open

Edit, repeat CS_Halloween 2
Selections, select none
4/
Effects, Image effects, seamless tilling, setting: default
Layers propreties, blend mode , soft light
Effects 3 D, drop shadow : 0/2/80/10 Black
5/
over the layer below (bottom layer)
Selections,load a selection from alpha channel, Sélection 2
Promote selection to layer
Apply the plugin: Carolaine and sensibility : CS-Dlines: 10/5

select none
6/
Effects, Distortion effects, Polar coordinates:

Effects, Reflection effects, Rotating mirror:

3D drop shadow : 2/2/80/30 Black
Effects Geommetric effects, circle, transparent marcado
Layers, Arrange, move up
7/
Activate the bottom layer
Selections, load a selection from alpha channel, Sélection 3
Promote selection to layer
Aplicar o plugin: Carolaine and sensibility , CS-DLines, as before
8/
Layers, new raster layer
Selections, modify, select selection borders :

Fill the selection with color 1 (Zoom in, if necessary)
Effects 3D, Inner bevel :

select none
3D drop shadow : 2/2/80/10 black
Layers , Merge down
9/
Layers, Duplicate
Layers, Arrange, bring to top
Image, Resize a 50%, all layers unshecked
10/
Layers, Duplicate
Image, Free Rotate a 90°, left checked, no other data unshecked
11/
Activate the layer below
Duplicate
Image, Free Rotate a 45°, left marcado, no other data unshecked
Objects, align, top
Objects, align, Right
Effects Reflection effects, Rotating Mirror , as before (memorized)
12/
Layers, Duplicate
Image, Mirror, mirror vertical
Image, Mirror, mirror horizontal
Merge down 3x
Overview of layers:

13/
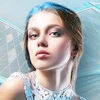
Load the tube character
(Preferably choose a woman tube)
Image, resize a 80%, all layers unchecked
Objects, align, right
Objects, align, bottom
(or according to your tube)
Effets 3 D, drop shadow : 0/0/80/30 Black
14/
Layers, new raster layer
Selections, load a selection from alpha channel, Sélection 4
Fill with color 1
Apply the plugin: Carolaine and sensibility : CS-Dlines:

15/
Selections, modify, select selecton borders, as before (memorized)
Fill with color 2
effects,3 D, Inner Bevel , as before (memorized)
Select none
16/
Layers, new raster layer
Selections, Load a selection from alpha channel, Sélection 5
Fill with color 1
Selections, modify, Select selection borders as before (memorized)
3D effects Inner bevel as before (memorized)
Select none
3D drop shadow : 1/ -1/ 80/ 3 black
Merge down
Reapply drop shadow as before (memorized)
17/
Image, add borders, symmetric :
2 px color 3
1 px color 1
5 px color 2
Selections, select all
Add borders, 40 px color 3
Selections, invert
Reflection effects, Kaleidoscope :

Adjust, Blur, gaussien, radius at 20
Selections, Invert
3D drop shadow: 1/ -1/ 80/ 30 black
18/
Select all, modify, Contract at 5
Apply the plugin: AAA frame, Foto Frame :

Select none
19/
Optionally:
Select 2 px white border (corresponding to matte)
fill with one of your colors
I filled with color 3
20/
Load the "déco coins”, copy and paste as a new layer
21/
Load the decoration brush: "pinceau"
copy and paste as a new layer
(color to adapt it to your colors)
place using the pick tool K:
position: X 42, Y 29
or
To proceed with your colors:
Put the BrushTip_Bokeh Bubbles.Pspscript in your folder PSP brush
About your PSP: Activate the paint brush (B)
if you can't load the document, create one like this:
Load the "pinceau broken bubbles. png" (together in the same folder)
File, export: Custom brush, create a brush Tip , add name, ok

Put Color 3 in foreground and color 1 in the background
Activate the paint brush and select the brush in question, with this data:

22/
Layers, new raster layer
Apply the brush over the top left corner
1 x Left click (mouse) to apply color 3
Position the tip of the brush slightly lower
1 x Right click to apply color 1
Position the tip of the brush slightly lower
Again Left click to apply color 3
(See example)
Place as explained above
23/
Sign your work
Add my signature (resize if necessary and blend mode soft light)
24/
Image, add borders 2 px color 3
Resize width at 950 px
Opcional:
Adjust, sharpness, unsharp mask, 5/15/5 , luminance only checked
Save as JPG/jepg
Contact:

My version 2, tube de Misstyca, thanks !!

Thank you Bea for having tested this tutorial

Thank you Alyciane for having tested this tutorial

 votre commentaire
 Suivre le flux RSS des articles de cette rubrique Suivre le flux RSS des commentaires de cette rubrique
Inédits de ma conscience
-
O crédito das imagens utilizadas
pertence ao devido Autor
Os meus tutoriais e traduções são protegidos por:
Interditos de qualquer difusão sem a minha autorização
Agradeço o respeito por o meu trabalho.

-