-
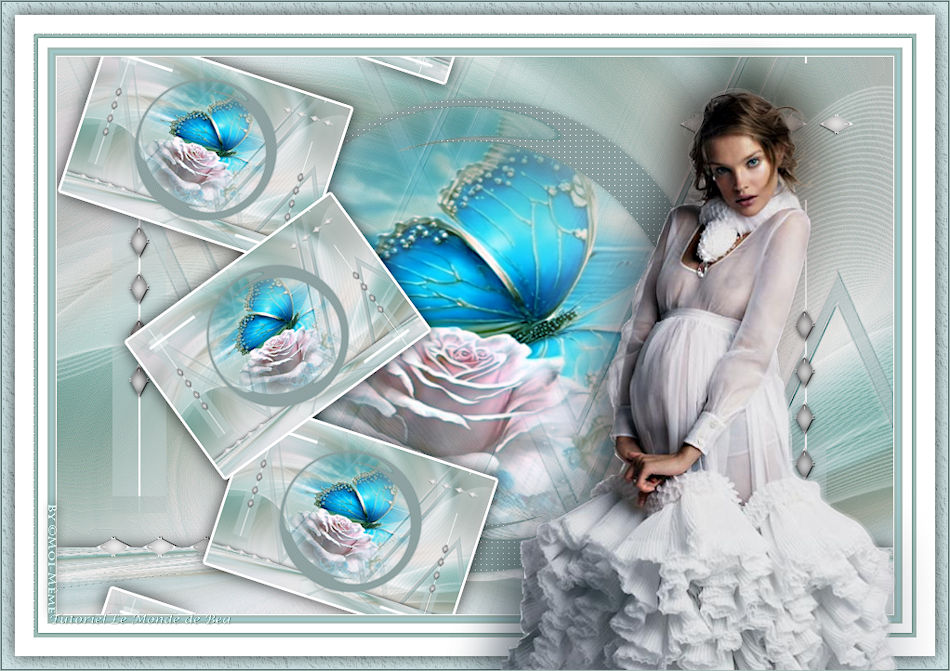
Le bonheur d'être mère
A felicidade de ser mãe
The happiness of being a mother

Este tutorial é da Autoria de Béa

Obrigada Béa, por me autorizar a traduzir o seu tutorial em português
Este tutorial é protegido por copyright
O material fornecido é protegido pelos autores dos tubes
É proibido de se apropriar ou modificar o original e/ou as assinaturas.
É proibido qualquer difusão sem autorização escrita.
Tutorial Original AQUI
Versão conforme ao original:

A minha versão: tube de Edwige, misted de EMA , Obrigado
Plugins:
Mura's Seamless - Flaming Pear -
Ap Lines - Mura's Meister -
Alien skin eye Candy 5 Impact - AAA Frames
Material AQUI
Retirar a assinatura dos tubes antes da sua utilização
Roteiro:
1.
Cores originais:

Foreground cor 1 #f6dcdd
Background cor 2 #ac6f702.
Carregar o ficheiro Alpha_LeBonheurDetreMereWindow/Duplicate
Fechar o original, trabalhar sobre a copia
3.
Carregar o tube mulher de LValella
Edit/ Copy
*Sobre o seu trabalho: Selections , select all
Edit/paste into selection
Selections, select none (remover a selecção)4.
Effects, Image effects, seamless tilling, settings: Default
Adjust, Blur, Radial Blur:
Layers, merge all
5.
Clique direito na paleta das layers - Promote background layer6.
Effects, Edge effects, enhance more
Adjust, sharpness, sharpen more7.
Layers, new raster layer
Preencher com a cor 2Carregar o mask NarahsMasks_1779
Layers, new mask layer from image :
Layers, merge group
8.
Effects, plugins: Mura's Seamless, Emboss at alpha como à abertura
Effects 3D drop shadow 0 / 0 / 100 / 10 Cor 1
9.
Sobre a layer Raster 1
Layers, new raster layer (juntar uma nova layer)
Preencher com a cor 1Carregar o mask Silvie_Mask:déco21M
Layers, new mask layer from image :

Layers, merge group
10.
Layers, properties, Blend Mode, screen11.
Activar a layer do topo das layers
Juntar uma nova layer
Preencher com a cor 2
Effects , Distortion effects, Lens distortion:
12.
Effects, Flaming pear, Flexify 2:
(print da autora)

Image, Resize a 85% (all layers desmarcado)13.
Selections, load a selection from alpha Channel, sélection 1:
Juntar uma nova layer
Carregar o misted de Sonia ou o seu
Edit/copy
*Paste into selection
Remover a selecção (selections, select none)14.
Layers, arrange, move down
Sobre a layer do topo (moldura)
Effects 3D drop shadow 0 / 0 / 100 / 10, Cor 2
Effects, Ap Lines SilverLining, Dotty grid:
15.
Na materials/ layers: clica para fechar o olho da moldura e da paisagem
Sobre a layer Raster 1 , layers merge visibles
Layers/Duplicate (duplicar esta layer)
Effects , plugins: Mura's Meister - Perspective tiling: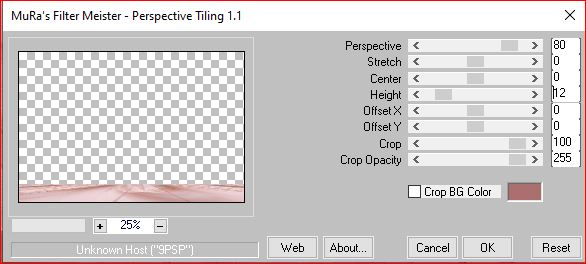
Effects 3D , drop shadow 0 / 0 / 75 / 25 , preto
16.
Abrir as duas layers do topo (Clique para tornar as layers visíveis)
17.
Sobre o topo das layers
carregar o tube Deco, copy
*paste as a new layer
Activar a pick tool "letra K", colocar:
Position X 19
Position Y -13
letra M para desmarcar18.
Carregar o tube losanges, copy
*Paste as a new layer
Activar a pick tool "letra K", colocar:
Position X 74
Position Y 180
(M)19.
Selections, select all, float, defloat
Effects , plugins: Alien skin eye Candy 5 Impact - Glass - Settings: Clear No Drop Shadow
Effects 3D drop shadow 1 / 1 / 50 / 1 preto
Remover a selecção20.
carregar o tube LignesLosanges, copy
* paste as a new layer
Activar a pick tool "letra K", colocar:
Position X 43
Position Y 62
( M)21.
Layers, merge visibles
Duplicar esta layer
Image Resize a 30% (all layers desmarcado)Selections, Select all, float, defloat
Selections , modify, select the selection borders:

Preencher de brancoRemover a selecção
Effects, plugins: Mura's Meister, Copies :
(print da autora)

Objects, align, left
Ou Activar a pick tool "letra K", colocar: Position X 022.
Adjust, sharpness, sharpen more (Adapte às suas cores)
Effets 3D drop shadow 0 / 0 / 75 / 25 preto23.
Image, Add borders, symmetric:
1 px branco
3 px cor 2
3 px cor 1
3 px cor 2
10 px branco
5 px cor 2
35 px branco24.
Coma a magic tool, seleccionar a borda de 5 px cor 2
Effects , plugins: Ap Lines, SilverLining: Dotty Grid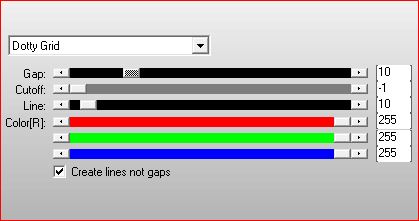
Adjust, sharpness, sharpen more
Remover a selecção25.
sobre o tube mulher, copy
*paste as a new layer
Image, Resize a 115% (all layers desmarcado)
Image, Mirror, Mirror horizontal
colocar como o exemplo final
Adjust, sharpness, sharpen26.
Layers/ Duplicate
Sobre a layer abaixo (original)
Adjust, Blur, gaussien, radius a 30
Layers, properties, Blend Mode Multiply, Opacity a 80, ou de acordo com suas cores27.
Sobre a layer Background
Selections, select all , Modify, contract de 15
Selections/Invert
Effects plugins: AAA Frames , Texture Frame:
28.
Juntar uma nova layer
preencher de cor 2
Layers, properties, Blend mode, hard lightou outro de acordo com suas cores a textura deve aparecer na cor
Layers, merge down
Selections/Invert
Effects 3D , drop shadow como antesRemover a selecção
29.
Assinar e juntar o watermark da autora30.
Image , Add borders, symmetric: 1 px de cor 2
Image, Resize, width a 950 px
Adjust, sharpness, unsharp mask, setting: softSalve em jpeg

 votre commentaire
Inédits de ma conscience
-
O crédito das imagens utilizadas
pertence ao devido Autor
Os meus tutoriais e traduções são protegidos por:

Interditos de qualquer difusão sem a minha autorização
Agradeço o respeito por o meu trabalho.

-