
-
Sternchen Alexandra (pt)
Sternchen Alexandra

Este tutorial é da Autoria de Béa

Obrigada Béa, por me autorizar a traduzir o seu tutorial em português
Este tutorial é protegido por copyright
O material fornecido é protegido pelos autores dos tubes
É proibido de se apropriar ou modificar o original e/ou as assinaturas.
É proibido qualquer difusão sem autorização escrita.
Tutorial original
Material AQUI
Vai precisar de um tube mulher (de preferência sentada)
Plugins:
Ap Lines
Carolaine and Sensibility
Mura's Meister
Unlimited
A minha versão, cores diferentes, tube de Jeanne, vasos de Nena Silva, Obrigado!

Roteiro:
1.
Cores originais:
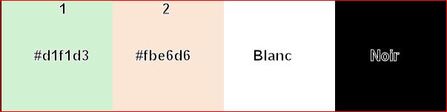

Cor 1 #d1f1d3
Cor 2 #fbe6d62.
Carregar o Alpha_SternchenAlex
Window/duplicate
Fechar o original e trabalhar sobre a copia
3.
Carregar o seu tube mulher
Edit/Copy
Sobre o seu trabalho: Sélections, Select all
Edit/paste into selection
Selections, select none4.
Adjust, Blur, radial:
Layers/duplicate (duplicar esta layer)
Image, Mirror, horizontal
Effects, Image effects, offset :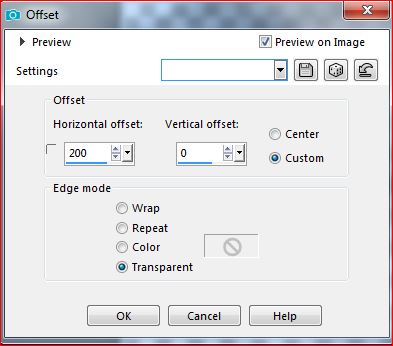
Layers, merge all
5.
Effects, Image effects, seamless tilling, setting: Default
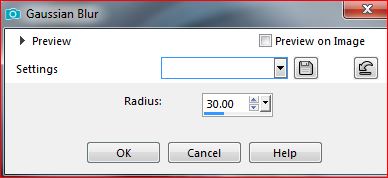
Adjust, blur, gaussien, radius a 30
Na paleta layers, clica direita sobre a layer, promote background layer (= raster 1)
6.
Layers, new raster layer (juntar uma nova layer)
Preencher com a cor 1Carregar o mask: Silvie_Mask_Abstract99L
Layers, new mask layers, from image:
Layers, merge group
Adjust, sharpness, sharpen
Duplicar esta layer
Image, Mirror, vertical
Layers, merge down7.
Juntar uma nova layer
Selections, load a selection from alpha channel
Carregar a sélection 1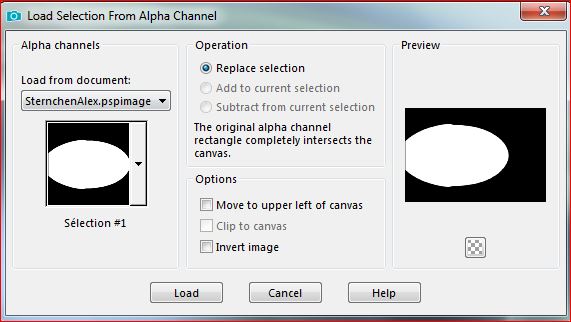
Carregar o tube paisagem de Mentali
Edit/copy
Sobre o seu trabalho: paste into selection
Remover a seleção (select none)
Layers, arrange, move down
Layers, propreties, blend mode soft light
Adjust, sharpness, sharpen more
Edit/ Repeat sharpnness, sharpen more
8.
Sobre a layer acima
Selections, load a selection from alpha channel
Carregar a sélection 2
Effects , plugins: Ap Lines - Silverlining
Remover a seleção
9.
Sobre a Raster 1, layers/duplicate
Fique sobre a copia , Fechar a layer Raster 1 (clica sobre o olho)
Layer, merge visibles
Ativar a selection tool "S" , custom selection:
Selections/ Invert
Selections , promote selection to layer
Effects, Textures effects, weave, preto :
Remover a seleção
10.
Image, Mirror, horizontal
Selections, load a selection from alpha channel
Carregar a sélection 3
Promote selection to layer
Remover a seleçãoImage, Mirror, horizontal
Merge down
Effects 3D drop shadow 0 / 0 / 75 / 25 preto
Merge down11.
Image, resize a 85% all layers desmarcado
Aplicar : Drop shadow como antes
Objects, Align, top, para colocarOu
Pick tool ( tecla K)
Position X 48
Position Y 0
(Tecla M)
12.
Ativar e abrir a layer Raster 1 (olho visivel)
Duplicar esta layer
Effects, plugins:Carolaine and Sensibility - CS-BRectangles , como à abertura

Mura's Meister - Perspective tiling

Aplicar a drop shadow, como antes
Layers, propreties, Blend mode: Overlay / ou dependendo das suas cores13.
No topo das layers
Juntar uma nova layer
Preencher de pretoCasrregar o mask Silvie_Mask_Deco9PC
Layers, new mask layer from image
Merge group
Blend mode: soft light, Opacity a 65
Effects , Image effects, offset
Adjust, sharpness, sharpen more
Effects, Edge effects, ernhance more14.
carregar o tube Deco, copy
Sobre a Raster 1
Paste as a new layer
15.Ativar a layer do topo das layers
carregar o tube DecoFleur, copy
sobre o seu trabalho: Paste as a new layer
Ativar a pick tool "K" , colocar:
Position X 8
Poisition Y 126
(M)16.
Duplicar esta layer
Image, Mirror, horizontal
Merge down
Duplicar esta layer
Image, Mirror, vertical
Merge down
Effects 3D drop shadow 2 / 2 / 50 / 2 preto
repetir a mesma drop shadow: em branco17.
Sobre a Raster 1Effects, plugins: Unlimited - Paper textures - papier kasy jeans

18.
Ativar a layer do topo das layers
carregar o tube Sparkles, copy
Sobre o seu trabalho: Paste as a new layer
Layers, arrange, move down19.
Copiar de novo tube mulher
Sobre o seu trabalho: paste as a new layer
(Image/Resize se necessàrio, all layers desmarcado)
Colocar em baixo à direita
Layers/duplicate
Sobre a layer abaixo (Original)
Adjust , Blur, gaussien, radius a 30
Blend Mode , Multiply
20.Print das layers (original)

21.Ativar a Raster 1, copy
Edit/paste as a new image, deixe de lado para depois
22.
Sobre o seu trabalho
Image, Add borders, symmetric:
1 px branco
1 px Preto
5 px Cor 1
1 px Preto
5 px Cor 2
1 px Preto
10 px branco
10 px Cor 1
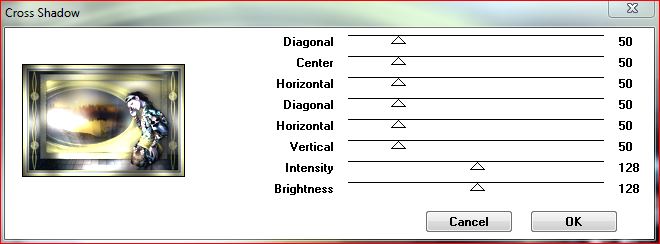
Com a magic wand tool, selecionnar este ultimo rebordo (10 px cor 1 )Effects, plugins:
Graphic Plus - Cross Shadow como à abertura
Ap Lines - Silverlining, dotty grid: como antes
Effects, Edge effects, enhance more
Adjust, sharpness, sharpen more
Remover a seleção23.
Image, Add borders, symmetric:
25 px branco
1 px preto
35 px branco
24.Copy/paste as a new layer, o titulo ( titre)
Selections , Select all, float, defloat
Preencher de preto
Selections, modify, contract de 1
Preencher de branco
Contract de 2
Edit/copy/paste into selection a copia raster 1 que deixou de lado
Remover a seleção
25.Carregar o tube vaso (vase), copy
Paste as a new layer
Resize a 75% all layers desmarcado
Colocar como sobre o exemplo ( no meu caso em baixo à esquerda)
Duplicar esta layer
Sobre a layer abaixo:
Adjust, blur, gaussien, a 30
Blend Mode, Multiply26.
Juntar o watermark da autoraAssinar
27.
Image, Add borders, symmetric: 1 px preto
Resize, width a 950 px
Adjust, sharpness, unsharp mask, setting: softSalve em jpeg

-
Commentaires
Inédits de ma conscience
-
O crédito das imagens utilizadas
pertence ao devido Autor
Os meus tutoriais e traduções são protegidos por:

Interditos de qualquer difusão sem a minha autorização
Agradeço o respeito por o meu trabalho.

-


