
-
Par ©Moi-Même le 30 Avril 2023 à 13:49
HOT

This tutorial is by Béa

Thank you Béa, for allowing me to translate your tutorial
This tutorial is protected by copyright
The material provided is protected by the authors of the tubes
It is prohibited to appropriate or modify the original and / or signatures.
Any dissemination without written authorization is prohibited.
Original Tutorial: On HERE
My version: tube by Luz Cristina, thanks!

Plugins:
Filters Unlimited :
Kang 1
Bkg kaléidoscope
It@lian Editors Effect
Graphic plus
::::::
Ap Lines
Mura's Meister
Material : On HERE
Vai precisar de um tube feminino, (escolha um tube sexy)
Colocar as selecções na pasta selections do seu PSP
Atenção: segundo o seu tube as cores serão différentes, ver o meu exemplo
Roteiro:
1.
Original colors:

Foreground, cor 1 #ba6345
Background cor 2 #523a29My colors:

2.
File, new image, transparent de 900x600 pixels
Load the woman tube
Edit/Copy
*Sobre o seu trabalho: Selections , select all
Edit/paste into selection
Selections, select none
Effects, Image effects, seamless tilling, setting: Default
3.
Adjust, Blur , radial blur:
Layers/Duplicate
Image, Mirror, mirror horizontal
Layers properties, Blend mode hard light, Opacity at 45
Layers, merge all4.
Effects, edge effects, enhance more
Adjust, sharpness, sharpen more
On materials/layers, on this layer, right click,, Promote background layer5.
Layers/Duplicate
Image, Resize at 65% (all layers unshecked)
Effects, plugins, Filters Unlimited, Kang 1 - Circuit weaver:
Effects, Image effects, seamless tilling, setting: Default
Image, Resize at 65%, all layers unshecked
Effects, Image effects, seamless tilling, as before
Layers, properties, blend mode, hard light (Adapt to your colors)6.
Result (author's print)
7.Effects 3D , drop shadow, Shadow on new layer marcado: 10/10/50/50, black

Stay on the shadow layer
Effects, plugins: Ap Lines - Silverlining :

Layers, properties, Opacity at 60
8.
On the Raster 1 Layer
Layers, new raster layer
Fill in background colorLoad the mask NarahsMasks_1783
Layers, new mask layer, from image:
Layers, merge group
9.
Effects, Image effects, offset:
Layers/Duplicate
Image, Mirror, horizontal
Layers, Merge down10.
Effects , Textures , weave, cores: black
11.
Result (author's print):

Current Layers:

12.
This step is optional
On the Raster 1
Effects, plugins: Xero , Tweaker:
Edit/repeat , Tweaker
13.On the top layer
Load the tube Deco
Edit/copy
* paste as a new layer14.
Load the tube decoligne, copy
* paste as a new layer15.
Image, Add borders, symmetric:
15 px color 2
15 px white
15 px color 116.
Effects, Image effects, seamless tilling: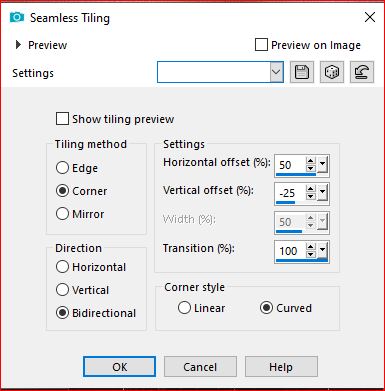
17.
Effects, Filters Unlimited , &<Bkg kaléidoscope> Quad Flip

18.
Load the tube Decocadre, copy
* paste as a new layer19.
Selections , load a selection from disk: carregar sélection hot_selection1
On the Background layer
Selections, promote selection to layer
Adjust, blur, gaussien blur, radius at 3020.
On the woman tube, copy
* paste as a new layer
Resize: to your liking to place the face and part of the bust within the selection
Selections/Invert
DELETE21.
(the new selection cancels the previous one)
Selections , load a selection from disk: carregar sélection hot_selection222.
Layers, new raster layer
Preparing a Radial Gradient (Foreground/background):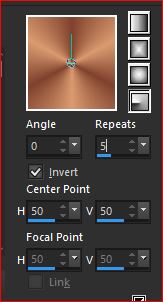
Fill with the gradient
Effects, Graphic Plus , Cross Shadow , how to opening23.
Effects, Textures , Textile: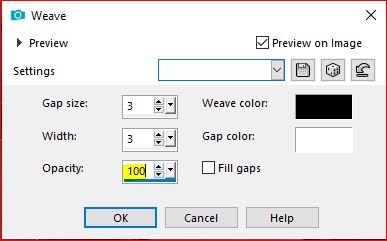
Effects 3D , drop shadow 0 / 0 / 65 / 25 , Black, shadow on new layer unshecked

Selections, select none
24.
On the top layer(author's print)

Layers, merge down 3 times
Effects 3D , drop shadow, as before
25.
Layers/ Duplicate
On the layer below (original)
Effects, plugins: Mura's Meister , Copies:(author's print)

About layer above
Layers, merge downEffects , Image effects, Offset:

Effects 3D , drop shadow, as before
26.
On the Background layer
Load the tube Deco2, copy
*paste as a new layer
Layers, properties, Luminance(legacy)Layers, new raster layer
activate the selection tool (S) , Custom selection:
Fill with the initial gradient
Adjust, blur, gaussien , as before (memorized)
Select none28.
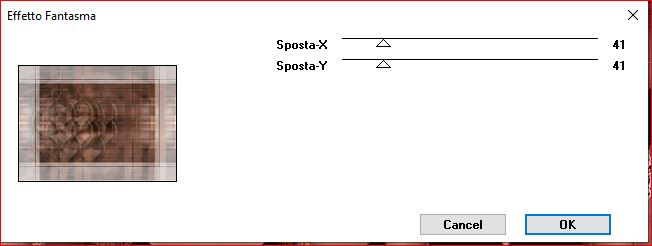
Effects , plugins:Filters Unlimited (ou fora deste), It@lian Editors Effect , Effetto fantasma:

Effects , Edge effects, enhance more
Duplicate
Merge downActivar a pick tool "K" , place it:

Position X 248
Position Y 0
(M to deselect)
29.
Duplicate
Image, Mirror, horizontal
Effects, Image effects, Offset: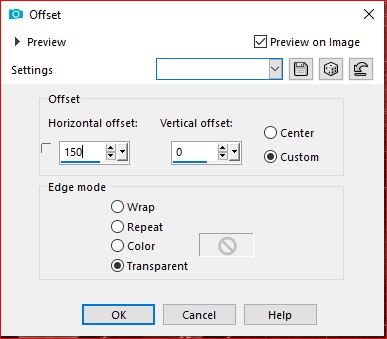
Merge down
30.
Duplicate
Effects, geometric effects, skew :
Layers, properties, Opacity at 45
Layers, arrange, move down31.
Layers, merge visibles
Image, Resize a 85% , all layers checked
32.
Image, Add borders, Symmetric:
1 px color 2
10 px white
1 px color 2
10 px white
5 px color 2
25 px white33.
With the magic tool , select the 5 px de color 2 border
Effects, textures , weave: new data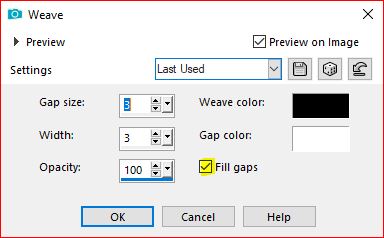
Select none
34.
On the woman tube , copy*paste as a new layer
Resize if needed (all layers unchecked)
Put how about the final example
Adjust, sharpness, sharpen35.
Duplicate
About layer below (original)
Adjust, Blur, gaussien , radius at 30
Layers properties, Blend mode Multiply, Opacity a 85 (adapt to your colors)36.
On the top layer
Load the title (titre)
Selections, select all , float, defloat
Fill with your color 2select none, copy
*Paste as a new layer
Place over the vertical lines on the right according to your taste and the position of your tube
Effects, Edge effects, enhance more
Effects 3D drop shadow 1 / 1 / 50 / 1 , black37.
On the background layer
Selections, Select all, modify, contract at 25
Selections/Invert
Effects, plugins:Filters Unlimited (ou fora deste) It@lian Editors Effects , Effetto fantasma (how to opening) :
Graphic plus, Cross Shadow, how to opening
Selections/ Invert
Effects 3D drop shadow 0 / 0 / 75 / 35 , black
Select none38.
Sign and add the author's watermark
Image , Add borders, symmetric:1 px color 2
Adjust, sharpness, unsharp mask, setting: SoftSave as jpeg

 votre commentaire
 Suivre le flux RSS des articles de cette rubrique Suivre le flux RSS des commentaires de cette rubrique
Inédits de ma conscience
-
O crédito das imagens utilizadas
pertence ao devido Autor
Os meus tutoriais e traduções são protegidos por:

Interditos de qualquer difusão sem a minha autorização
Agradeço o respeito por o meu trabalho.

-


