
-
Par ©Moi-Même le 25 Janvier 2023 à 11:10
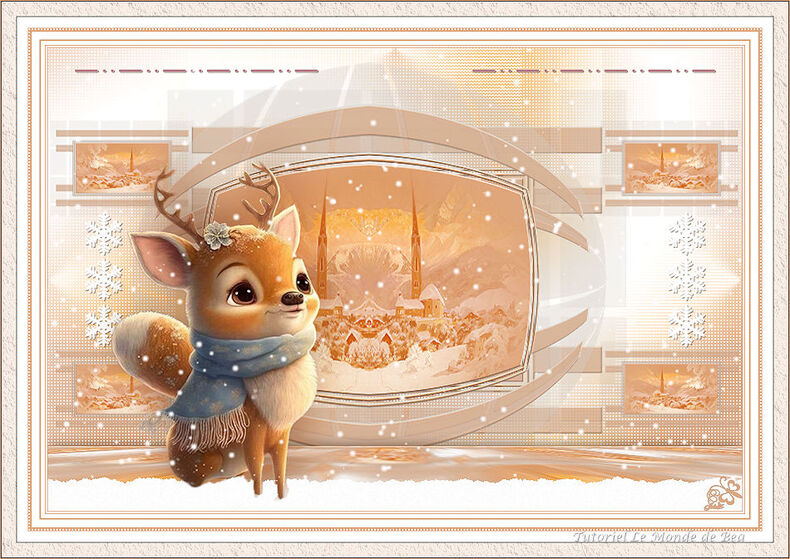
Fantasy Winter

This tutorial is by Béa

Thank you Béa, for allowing me to translate your tutorial
This tutorial is protected by copyright
The material provided is protected by the authors of the tubes
It is prohibited to appropriate or modify the original and / or signatures.
Any dissemination without written authorization is prohibited.
Original Tutorial : On Here
Version conforms to the original:

My version, tube by Elly, landscape by Lisa T, Thank you!

Material: On Here
Plugins:
Mehdi
Mura's Meister
Mura's Seamless
AAA Frames
Start :
original colors:

1.
put the colors:
Foreground color 1 (White)
Background color 2 (#b98087)2.
Effects, plugins: Mehdi - Wavy lab 1.1:
Adjust, blur, gaussien at 15

3.
Layers, new raster layer
Fill in color 2Load the mask sdtMask315
Layers, new mask layer from image: Invert checked
Layer, merge groupe
4.
Effects, plugins: Mura's Seamless - Emboss at alpha, how to opening
5.
Selections, load a selection from alpha channel, sélection 1
Carregar o misted paisagem
(Remove watermark from tubes)
Edit/ Copy
*On your work: Paste as a new layer
Image, Resize a 125%, all layers desmarcado, 2 times (or the necessary for your tube)
Selections/Invert
DELETE
Selections, select noneLayers, propreties, Blend Mode , Hard light
Layers, merge down6.
Image, Resize a 85% all layers unshecked7.
On the layer raster 1
Effects, plugins: Unlimited - AFS IMPORT - Sqborder 2 , how to opening
8.
On the layer below
Objects, Align, leftOr activate the pick tool ( K Key), place it:

Position X 0
Position Y 54M Key to deselect
9.
Layers, duplicate
Image, Resize at 25% , all layers unshecked
Activate the pick tool ( K Key), place it:
Position X 715
Position Y 94(M)
10.
Layers, duplicate
Activate the pick tool ( K Key), place it:
Position X 715
Position Y 380
( M)11.
Layers, merge down
Effects 3D , drop shadow 0 / 0 / 50 / 1 Black
On the layer below, apply the same drop shadow (memorized)Result :

12.
Activate layer on top of layers
Layers, merge down
Layers/Duplicate
Effects, geometric effects - Circle:
Image, Resize a 115% all layers unshecked
Effects 3D Drop shadow 0 / 0 / 50 / 1 whitecurrent layers:

13.
Edit/copy Special, copy merged
*Edit/paste as a new layer
Effects, Image effects, seamless tilling, setting: Default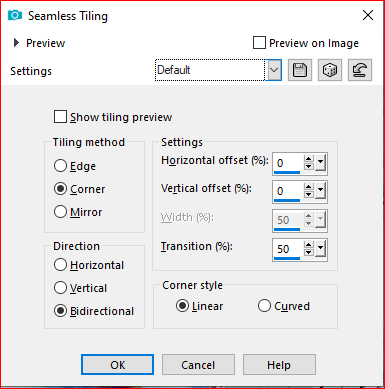
Adjust, Blur, gaussien, Radius at 5
Effects , plugins: Mura's Meister - Perspective tiling:
Adjust, sharpness, sharpen
Effects 3D, drop shadow 0 / 0 / 75 / 25 black14.
On the layer below ( copy of Group-Raster 2)
Effects , reflection effects , rotating mirror, rotation angle at 180:

On layer below (Groupe Raster 2)
Effects , reflection effects , rotating mirror, rotation angle at 0
15.
Result:

Activate layer on top of layers
Load tube Flocons, copy
* Paste as a new layer
Effects 3D drop shadow 1 / 1 / 50 / 0 black16.
Load the tube ligne, copy
* paste as a new layer
Activate the pick tool (letter K) place it:
Position X 34
Position Y 27
(M)
Effects 3D drop shadow, as before (memorized)17.
On the layer Raster 1
Selections , load a selection from alpha channel, sélection 2
Selections, Promote selection to layer
Selections, select none18.
Layers, propreties, Blend Mode , hard light
Effects, Image effects, seamless tilling, setting: default
Effects 3D drop shadow 0 / 0 / 100 / 100, Color 2
Layers/Duplicate
Image, Mirror, horizontal19.
Activate layer on top of layers
Load the tube personagem, copy
* Paste as a new layer
Image, Resize: 1 time at 75% , an one more time at 90% (all layers unshecked)
Image, Mirror, horizontal
Put a little to the left20.
Layers/Duplicate
On the layer below (the original)
Adjust, Blur, gaussien, radius at 30
Blend Mode, MultiplyStay on this layer
21.
Load the tube Snowscape, copy
* Paste as anew layer
Place at the bottom (objects, align, bottom) see the final example22.
Load the tube neige, copy
* paste as a new layer23.
Image, Add borders, symmetric:
1 px Color 2
2 px white
1 px Color 2
5 px white
2 px Color 2
10 px white
5 px Color 2
35 white
Activate magic wand tool, select the 5 px color 2 border
Effects , textures , weave, both colors: White
Select None
24.
Effects, plugins: AAA Frames - Texture frame:
25.
Layers, new raster layer
Selections, select all/ modify, contract at 20
Selections/ Invert
Fill in color 2
Layers, propreties, Opacity at 30Selections/select none
26.
Sign and add the author's watermark27.
Image, Add borders, symmetric: de 1 px de Color 2
Image, Resize width at 950px
Adjust, sharpness, unsharp mask, setting: Soft
Save as jpeg

Thank you Jolcsi
 votre commentaire
 Suivre le flux RSS des articles de cette rubrique Suivre le flux RSS des commentaires de cette rubrique
Inédits de ma conscience
-
O crédito das imagens utilizadas
pertence ao devido Autor
Os meus tutoriais e traduções são protegidos por:

Interditos de qualquer difusão sem a minha autorização
Agradeço o respeito por o meu trabalho.

-


